Photoshop has been widely used to change, and most often to improve a person’s appearance. Today we will consider the question of how to remove the second chin in Photoshop, as it is one of the most popular. For this work, you will need a little knowledge of the program itself and good source materials, which we will talk about later. So, get ready to learn how to remove the second chin in Photoshop.
Necessary funds
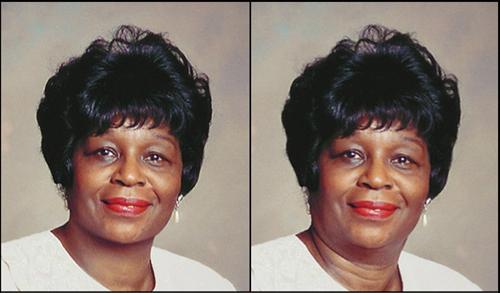
For this work, we need at least two photographs: one photo on which the change will be made, the other with a "donor" picture. Under the latter, a photograph with the desired chin is assumed. I think this method is more appropriate than other methods with full manual rendering. Such a substitution of images allows you to quickly and efficiently remove the second chin in Photoshop. Moreover, there is no need to know perfectly all the tools of this program.
Instruction manual
As mentioned above, this method is based on the replacement of images, and therefore the most important and crucial step in this work can be considered the search for photos of the "donor". It is important that both images are taken from the same angle. It is also desirable to match the size of the photos, but this is not critical. Next, instructions will be presented on how to remove the second chin in Photoshop.
- As soon as the "donor" image is selected, it is necessary to cut out the area with the desired chin. Make a selection with a large margin, as it is harder to draw than just erase the excess.
- Place the cut-out area with the donor chin on the main image. Stretch it or reduce it using the Free Transform tool (Ctrl + T). It is necessary to observe proportions, for this hold the Shift key while resizing. It is necessary to reduce or stretch until the “donor" chin becomes the same in width and size as a real one. Do not rush at this stage and do everything carefully. Thus, we remove the second chin, or even, you can say, replace it.
- In the layer overlay options, select Multiplication. At this stage, you can erase the excess parts of our "donor" chin, which appeared as a result of inaccurate allocation.
- At the moment, the bulk of the work has already been completed. It remains to make some color settings, since it is almost impossible to find a photo of a donor with completely identical properties. Therefore, we need to adjust the color manually. To do this, open the tool "Hue / Saturation" (Ctrl + U). We change the values depending on the situation. We also need the tool “Levels” (Ctrl + L).
- Make settings to your liking. Unfortunately, I cannot give you exact values, since they will be individual in each case.
Conclusion
I hope this article helped you learn how to remove the second chin in Photoshop. By the way, this instruction may come in handy everywhere. It can be applied not only to the chin, but to any part of the face, body, etc. It is enough to understand the basic idea of the entire instruction. Then you can apply it in almost any situation when there is a need to change the appearance.