Despite the fact that the concept of “photoshop” is sometimes used with a hint of negative meaning (unnatural, artificially, embellished, stretched, etc.), face retouching remains one of the most popular topics related to image processing.
Many programs are engaged in the art of computer makeup, but the Photoshop image editor has perhaps the most extensive arsenal of retouching tools, which can not only fix facial skin imperfections with just a few clicks, but also turn a not-so-attractive person into a handsome man (which many people do) glossy magazines).
It will be a question of both the amateur level of correcting photographs using destructive tools or methods, and the professional technique when face retouching in Photoshop is performed filigree - absolutely not violating the structure of layers and, accordingly, the texture and texture of the skin.
How to fix facial imperfections using Photoshop retouching tools?
The tools that are used to retouch photos are provided mainly to eliminate all kinds of defects and artifacts. When it comes to skin, it can be moles, blackheads, wrinkles, scars, swelling under the eyes, bright highlights or sharp shadows, pores, pimples and other troubles. We will provide brief information on what the tools described below can do when performing retouching of facial skin .
- Stamp tool (ClonestampTool). Clones the skin with a fragment of the sample, which is selected on the face by left-clicking with the Alt key, carefully following the cross, which moves in parallel with the main cursor, showing where the sample is currently being taken from.
- A “pattern stamp” (patternstamp) does not clone, but draws with textures, and if the desired texture is added to the standard set, the stamp will draw it, but this will not be a retouch, but rather a virtual “skin transplant”.
- “Patch” (PatchTool) also knows how to clone, but not by a point model, but by entire areas that move to the necessary places where they take root. Depending on the settings, either the contents of the selected area are transferred to the desired location ("Destination" mode), or the empty selection is dragged to the place of the desired content ("Source" mode).
- The Spot Healing Brush (SpotHealingBrush) only requires the user to set the appropriate size before just clicking on an unwanted spot of any origin, so this tool is simply indispensable when you need to make a detailed face retouch in Photoshop.
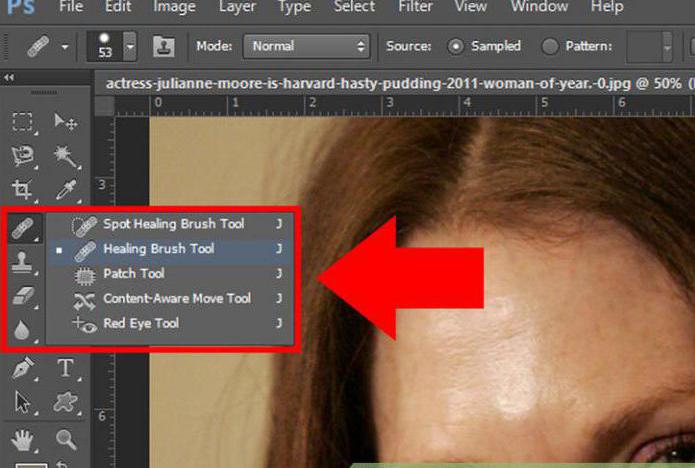
- The healing brush (HealingBrush) works on a principle similar to the stamp operation algorithm, only here when cloning takes into account the color and texture of the retouching area, and the user is allowed to independently adjust the brush parameters, including not only size, but also shape, rigidity, angle, intervals during movement and pen pressure.
All of the listed tools are used only to eliminate the basic skin problems, and for glamorous refinements, commands from the Filter menu, lightening / darkening tools, variations of the Fill command and some other tools are used.
Let's consider how to make face retouching in Photoshop using only the darkening and lightening functions.
Curves: retouch with adjustment layers
This method is used by professionals and its essence is to correct (even out) the skin tone on the auxiliary layers by darkening the highlights (protruding) against the mid-tone background and lightening the dark areas (shadows).
To do this, create two adjustment layers - “Curves” above the background layer with the face image to be retouched. One of them will be brightening - a symmetrically convex curve to the level of the most light part of the face skin, and the second - darkening, that is, a symmetrically concave curve to the level of the darkest part of the face skin, and the masks of both adjustment layers must be converted (Ctrl + I).
Now it is desirable to discolor the image, since in the black and white version it is easier to retouch the face, since all the bumps and roughness are more contrasted. To do this, create an auxiliary new layer, fill it with black and change the blending mode to “Color”, and even better, if we make a copy of this layer and set the blending mode (blending) to “Soft Light”, reducing need opacity.
Next, go to the mask of the brightening adjustment layer (or darkening first - there is no difference), take a soft brush (the first color is necessarily white) with an opacity of not more than 10%, set the required size (the smaller, the better) and, greatly enlarging the image, we start Patiently lighten darkened areas around an unwanted skin texture.
Then we switch to the mask of the darkening layer and cope with light areas of the skin with the same persistence, periodically overlapping black and white layers to control the result in the color image. Scrupulous work, but the result is worth it.
Retouch with lightening or darkening tools
This method of non-destructive photo correction called Dodge-Burn is often used when you need to do some work using Photoshop. Retouching of the face (in Russian the name of the method sounds like “Dodge Burn”) is performed with its help.
In essence, the method is similar to the previous one using Curves, but here only one layer is used to brighten and darken, which are created above the photo layer and fill it with a neutral color of 50% gray (Edit → Fill), changing the blending mode to “Soft light”.
Then you can safely retouch the skin on this auxiliary layer, smoothing its texture using the Dodge Tool and Burn Tool, or using a soft brush (white to lighten and black to darken), choosing the necessary opacity .
Retouch: tools of the Filter group
For a relatively quick and effective result of glamorous photo processing, Photoshop often uses the blur and noise reduction functions, the analogues of which are used by almost every photo editor. Face retouching made in such ways rarely corresponds to a professional level, because blurring, one way or another, leads to a violation of the skin texture, the degree of which depends on the art of a virtual makeup artist.
In fact, the method consists in “smoothing out” irregularities and smoothing the skin tone. Below are options for such processing.
Smooth the skin with the Noise tool
First of all, on a duplicate of the layer of our photo, you need to select the face skin using the selection tool suitable for the particular case, including the “Pen” and the mask, or, conversely, remove everything except the skin from the face area with the soft (about 50%) “Eraser” including eyes, eyebrows and lips.
Having finished the selection (or separation) of the skin area, go to the Filter menu and select either Retouch, where you will have to repeat the effect several times (Ctrl + F), or Median, in which the radius value is selected experimentally for a specific image. If the face has become too artificial, you can add a little “Noise” to it and then blur it “according to Gauss,” but you still can’t avoid significant loss of skin texture, which is the main disadvantage of this method.
Face Retouching Using Blur
This retouching aid is generally similar to the previous one, only in this case the corrected image of the face (or selected area of the skin) is conditionally divided into two layers (duplicate images or highlighting): on one of which the skin is smoothed, evening out the tone and softening the contrast, and on the other ( above the first) - restore the texture.
The tasks of the smoothing layer are solved (when the visibility of the other is closed) using the “Surface blur” command with a radius of about 7 px and threshold / isogel within 10-11 levels, or “Gaussian Blur” in the “Filter” menu.
If after applying the effect on the “smoothed” layer there are unwanted elements left, they can be gently painted over with a soft brush, choosing a suitable color on the face with a mouse click at the desired point together with the Alt key.
To the layer (the second copy of the image or selection), which is responsible for the texture, that is, for restoring (returning) the details lost due to blurring, the Noise Ninja noise-canceling plug-in justifies itself, but you can get by with the “Noise” filter from the “Noise” group by setting the necessary effect parameters are mainly, and if necessary, in the additional mode, having worked there with the most problematic channel.
Having got rid of excess noise, the texture can be developed by slightly lowering the contrast and working with the settings of the “Unsharp Mask” filter.
Now, to complete the retouching of the face, it remains only to combine the contents of both layers into a single whole, for which, having risen on the texture layer, go to “Filter” → “Other” and select “Color contrast” (High pass) with a small (no more than 8 ) radius, so that only the contours of the face elements remain.
Then go to “Hue / Saturation”, which is located in the menu “Image” → “Correction” and completely remove the saturation (-100). Finally, replacing the blending mode on this layer with “Overlay”, we will return the skin to a lost texture, which, if necessary, can be enhanced by slightly increasing the brightness.
In addition to the main graphics editor, donated to the world of Adobe, today there are many other programs on the Web, including those specializing in virtual makeup, each of which is a full-fledged photo editor. Retouching faces in them is performed almost automatically.
Retouching plugins in Photoshop
One of the most powerful and popular “photo retouching” plugins for photo retouching, including “face care2” operations, is the Nik Color Efex Pro Complete 3.0 plugin, which holds more than fifty filters and about 250 effects.
The efforts of these filters are aimed at improving photos in general and adding artistic effects, but plugins such as Dynamic Skin Softener, Glamor Glow and Tonal Contrast and some others solve the “glamorous issues”.
ArcSoft Portrait + 3.0.0.402 RePack / Portable plugin is also popular among users. He, in fact, is a photo editor, retouching faces in which it is possible to do in a matter of seconds. The program automatically evaluates the condition of the skin and corrects the image according to 17 parameters, after which it is already difficult to find fault with something. The plugin skillfully copes with skin imperfections, preserving its texture and without affecting the basic elements of the face.
Retouch online
Today, in order to give the face a natural attractiveness without hassle, one does not need to understand the intricacies of the art of retouching, and even install special programs. Many online resources, for example, gde51.ru/services/retush-photo or makeup.pho.to/ru/ offer absolutely free retouching of photos, including applying makeup.
They will help to achieve such visual effects as smoothing and removing wrinkles, ridding the skin of dermatological imperfections, removing red eyes, eliminating oily sheen, and evening out the skin, adding a glamorous effect. Among other things, such programs are able to style the image using dozens of ways.