Paper is one of the most recognizable materials. That is why it is used to create various textures in Photoshop. This article will focus on the effect of wrinkled paper. This texture is created quite simply, and how to achieve it, we will consider further.
For starters, of course, open Photoshop. It will need to create a new image. For this purpose, go to the "File" menu and select New. Make sure that the window is set to RGB mode. The file size can be arbitrary, but it is better to match the resolution of the photo or image on which you want to make the effect of “wrinkled paper”. Photoshop allows you to create a new file of the right size without unnecessary "troubles". To do this, simply open the image that you want to “mash”, make it full selection using the “Rectangular Region” tool, and then copy through the “Edit” menu. After that, remove the selection, go to "File" to create "New". Thus, the new file will automatically gain the same dimensions as the photograph.
So, before us is a blank virtual sheet, on which we will now create the effect of “crumpled paper” in a matter of minutes. To do this, select the tool called "Gradient", and in the upper horizontal panel do some settings, namely:
1) choose a black and white type of gradient;
2) set the gradient style linear;
3) in the mixing mode, select the item "Difference";
4) the opacity should be equal to one hundred percent.
The settings are over. Now we proceed directly to the process of creating a crumpled paper texture. To do this, we begin to create a gradient fill at various angles. We do it many times, changing at the same time in an arbitrary order the angles of inclination of the fill and the width of the transition. As a result, you should get an image of gradients that intersect in a chaotic order. There will be bruises in the places where they intersect, therefore it is desirable to achieve a pattern in which most gradient transitions converge at one point.
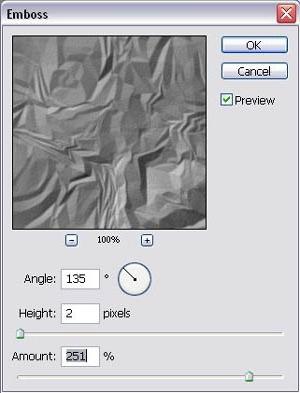
Next, apply the stamping filter to the resulting image. It is located in the "Stylization" option. Having chosen "Embossing", a window with settings will appear in front of you, and the gradient pattern will look like gray wrinkled paper. You can move the sliders in the settings and achieve the most suitable result. So, for example, the “Height” function, with a large value, gives the picture more rounded, blurry outlines. The “Effect” function enhances or decreases the brightness and sharpness, and the “Angle” is responsible for the angle of incidence of lighting on the terrain. So you can experiment, and then click "OK."
Now we need to transfer the resulting texture to the image that we want to give the “wrinkled paper” effect. To do this, you need to use the cursor (arrow) to grab the texture and carry out the transfer. You see that the texture completely covered the image, so the next step will be a “trip" to the palette of layers. There, at the very top, there is a drop-down line in which you need to click on the type of blending called "Linear Light". After clicking, the texture will mix with the image, you will get the desired crumpled photo.