The raster processing program, the Photoshop photo editor is a favorite tool of designers, photographers, collages and all those whose professional or creative activities are related to working with images. In the large arsenal of opportunities that this application offers, it is sometimes very difficult to understand for a beginner who, for now, wants to master the simplest processing methods. For example, very many people are interested in how to lighten a photo in Photoshop. We will show you several different convenient ways to solve the problem.
How do the tools work?
Tools that lighten or darken a digital photo in Photoshop are based on the principle of a dark room. In other words, in order to bring the image closer to the window, the light source, the brightening function is used, to darken it, it is dimmed.
We will analyze how this is applied in practice further, simultaneously examining in practice how gamma correction takes place in Photoshop.
Brightness / Contrast
The simplest tool of any graphic editor. Professionals do not like him for being rude - some parts of the photo may become highlighted. However, to correct a photo that was darkened when shooting, it can be used.
Finding a tool is easy:
- In the top menu bar, find “Image”.
- In the drop-down list, click on "Edit", "Correction" (Adjustment).
- Click on Brightness / Contrast.
- Now, moving the sliders in the window that appears, lighten the photo to the extent that you need.
If you want a softer result, then you should make a copy of the original layer and work with "Brightness / Contrast" already with a duplicate. Then, at the end of the manipulations, set the appropriate transparency values for the latter, so that the photo is illuminated more harmoniously and naturally.
"Levels"
How to lighten a photo in Photoshop yet? Use the Levels tool, which works more gently with the image:
- Go to the "Image", from the drop-down list, select "Correction".
- Find the "Levels" item.
- In the window that appears, to brighten the photo, it is enough to move the middle gray slider to the left. If you want to give the picture a little more contrast, then the white slider is also worth moving a little there.
- If some areas turned out to be overexposed, then “beat” over the sliders on the lower gradient strip in the “Output Levels” window.
"Light / shadow"
Another way to lighten a digital photo in the Photoshop photo editor is to use the Light / Shadow tool. We will act according to such a simple algorithm:
- "Go to" Images ", then -" Correction ".
- Find and select the Shadows / Highlights tool.
- Here, as in previous cases, we will move the sliders in the window to achieve the desired effect. The tool is good in that it helps to correct the dark areas, without touching the light ones.
We advise you not to push the slider beyond the values above 50 - with them ugly pixel halos may appear around objects.
Overlay "Lighten"
How to lighten a photo in Photoshop, if it is very darkened? Professionals are advised to turn to overlay in this case:
- Three to four times copy the original layer - your photo.
- For all duplicates, set the blending mode to "Screen" (Screen).
- By stopping at each of them (those that you do not touch upon at the moment, you can make them invisible by clicking on the “eye” opposite each), and using the sliders in “Opacity”, achieve the best effect.
If you are already a confident user, then you can set for some of the words "Overlap" and "Soft light." For a more harmonious lightening on each of them, you can work with a soft brush of white, gray, black color, adjusting its transparency.
Thus, a light shade of the instrument will additionally lighten, a dark shade will darken, and gray will provide a soft transition of light to shadow. Remember to also arrange the layers in the best order for the photo.
Curves
Many professionals lighten photos in Photoshop using this tool. This is done very easily:
- Go to “Images” and then to “Correction”.
- Select the Curves tool.
- You will see a kind of parabola on the chart. To lighten the image, you need to raise / lower its branches in order to achieve the best effect.
- You can slightly correct the result obtained with the Shadow / Light tool, which we have already examined.
Using Dodge
Correction of the photo using the Clarifier tool is very interesting - the photo is not fully clarified, but only in certain areas, points that you directly process. Image correction occurs according to such a simple plan:
- Open the photo in the program.
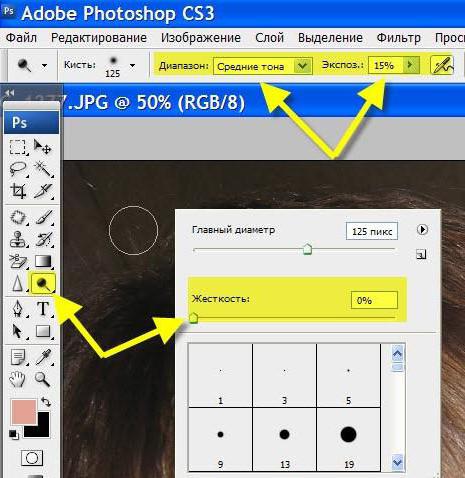
- Find on the toolbar (standardly located on the left) "Dodge" - a schematic image of a magnifier.
- In the top menu bar, adjust the brush thickness, intensity, lightening strength.
- Pay attention to the "Range" tab - select what you specifically need to process:
- "Bright areas" - you adjust the exposure in the brightest areas of the image.
- "Midtones" - changes the average range of gray shades.
- "Shadows" - lightening the darkest parts of the image.
- Now is the time to set the exposure value for the instrument.
- You can make the brush airbrush by clicking on the pencil icon drawing a spray line.
- To prevent the original color from distorting during your work, check the "Keep tones" box. This is precisely what leads to the minimum clipping of shadows and light.
- How to lighten a photo in Photoshop? Work with the mouse cursor, like a pencil or brush, processing the necessary areas.
What parameters to set specifically for your photo is a purely individual matter. Only the trial and error method will help to achieve the best result , since in the History you can always roll back unsuccessful actions.
Thus, you can lighten a photo in the Photoshop editor with a host of simple methods. To achieve a softer and more natural effect, you need more patience and experience - no instruction will prescribe what needs to be done specifically with your image so that it becomes aesthetically perfect. The way out is to try several methods and dwell on what is most convenient for you in achieving the best effect.