The actions of users who are trying to somehow speed up the launch and operation of the version of the Windows operating system installed on the computer look completely natural. Due to the fact that the system’s own tools do not allow to make completely and finely tuned parameters, a lot of special applications are being developed for such purposes. And one of the most interesting is Autoruns. How to use the program, using absolutely all its capabilities in the Windows environment, and will be further considered. In addition, we will pay special attention to some important settings, since excessive enthusiasm for disabling unnecessary, as it seems to the user, system components can lead to the most unforeseen consequences.
What kind of program Autoruns: the main purpose
So what is this application? Based on the official description of the developer, and also taking into account a lot of feedback from users and specialists, the application primarily refers to tools for fine-tuning the operating system in terms of activating or disabling its components, which start directly at boot, but are not needed at all by the average user. In addition, many note that the application is also able to act as a kind of informative utility that provides the most complete reports on running services and processes. In this regard, it is somewhat reminiscent of the notorious Process Explorer application. However, few people know that this application is able to scan the system for viruses and for the integrity, presence or absence of some important files. Thus, the Autoruns program can be called both an optimizer and an antivirus. Of the second, of course, one can argue, because the application issues notifications, referring exclusively to online resources with anti-virus databases, and not to generally recognized proven tools. Nevertheless, the application quite often detects such hidden threats that are not detected by either regular or portable antivirus applets.
Where to download the app?
As for downloading the installation distribution, the most natural solution is to download the utility directly from the developer's site. No less often, when setting up a search on the Internet, you can also find links to Microsoft technical support, not to mention countless resources on the Internet.
The application is distributed free of charge and includes two main components - Autoruns and Autorunsc (in the official release). However, for the average user only the first utility will be enough.
Note: unfortunately, there is no Russian version of this system utility on the official resource, so you will have to download the Russified version from another source.
How to install Autoruns for Windows in Russian?
Now we assume that the installation package is fully downloaded.
The installer of the latest version 13.91 takes up a little more than 3.6 MB on disk and includes the Autoruns manual in the form of a compiled HTML help file (only in the official version). The Russian-language modification consists of only one EXE-file.
To install / start the program, this executable file is used, which on Windows systems of the seventh version and higher (if the built-in superuser account is not disabled) should be run exclusively on behalf of the administrator. From the full release, the Autorunsc applet is not necessary to install, since it is designed to work using the command line, and the ordinary user needs a simple graphical interface. Next, you must agree to the license agreement, after which the program starts. Please note that in the usual sense, the utility does not need to be installed, since it is portable.
First launch and introduction to the interface
Finally, the program is running. Now we will go directly to how to use Autoruns in Russian for Windows 7 or any other version of the system.
The main window displays all active current processes by default. The main panel includes several standard menus and special tabs that are responsible for certain settings. If you've used Process Explorer at least once , the obvious similarity between Autoruns and this utility is immediately apparent. The process window opens in an expanded form and contains information not only about the name of the process itself, but also about the location of the files, information about digital signatures of publishers, installation date (timestamp) and suspicions of the possible presence of viruses (Virus Total).
Preset for registered users on the computer
Since the instructions for Autoruns are not presented in the Russian version, you can download the English-language package and read it in English. If there is no such desire, we proceed to the direct configuration of the main components. First of all, you need to choose a user if there are several registration entries in the system. To do this, use the corresponding menu on the top panel. However, if the user is only one and is, so to speak, his own administrator, this item may not be.
The main components of the options menu
Speaking about how to use Autoruns.exe, you should not lose sight of some important display parameters of system components, processes and services. Go to the selection menu first and pay attention to the default settings.
Of the first four items, it is recommended that you set aside only hiding the Windows entries, which will not harm the vital components of the operating system itself. Everything else can be edited, and at the same time get information about possible suspicions of viruses.
Note: not all system processes can be started as administrator by default, therefore, in the file menu of the Autoruns (File) program, any marked process or service can be started with elevated privileges.
Scan Settings
Now you need to configure the scanning options, which will subsequently be used to automatically detect problems with the ability to fix errors and failures, as well as activate additional controls.
To do this, go to the corresponding item in the same selection menu, and select all lines except the first in the options installation window so that scanning is performed not only in the location of the selected user, but also in all other places (viruses can be hidden anywhere, after all). After that, you need to click the rescan button and wait for the results of the scan to appear.
Validation Results
If missing objects are detected, program warnings will be issued automatically.
So, for example, when a message appears regarding the launcher of the remote Opera browser, in the example above, this indicates that there is an entry in the registry about this object, but the file itself is missing.
The results can be marked in different colors, and for them in the column for detecting virus threats there are some numbers and numbers. White selection corresponds to the fact that everything is in order with the process, its files and additional attributes.
Pink indicates objects that are not digitally signed, and yellow indicates physically missing files on the hard drive for which entries remain in the registry.
In the virus scan report, the first figure corresponds to the number of suspicious threats found, and the second to the total number of checks. Some processes may not be viruses. In addition, it is worth considering the errors of the verification toolkit itself. You can refine the information by clicking on the selected result, after which it will be redirected to an Internet resource containing a detailed description of the suspicious file or process.
Note: you can often find inclusion in the risk group and some iObit software products. But the optimizers, defenders and uninstallers of this developer are better not to touch, because they are not viruses. Nevertheless, if such components have red numbers in the report, it is recommended to disable them in the startup section.
How to use Autoruns: what to remove or disable in autorun?
Now we turn to one of the most important sections - the auto start of services and applications that run with Windows. The difference in comparison with the system configurator (msconfig) can be felt immediately. Autorun Manager or the autoload management tool in the described utility assumes the initial display of all processes in the main window. To deactivate an element, just uncheck the line containing it. But how to use Autorun Manager so as not to accidentally disable something important? By and large, you can deactivate almost everything, leaving only the command line, antivirus and components, for example, related to the operation of touchpads on laptops. But if you act wisely, it is better to disable only pink-marked processes.
For fidelity, you can visit the tab of executable applets at system startup. If empty locations are shown there, you can also delete them or, if necessary, find information in the online search.
Login Components
On the login tab that corresponds to the Logon process, elements that are not needed by the user are disabled, but some of them can be deactivated in the main process window. Since Windows components are not displayed (this option was disabled at the pre-configuration stage), you will not harm the system.
Explorer Options
But, talking about how to use Autoruns, special attention should be paid to the parameters of the built-in file manager, known as the "Explorer". Deactivating the selected components on this tab allows you to remove them from the context menu, which in the operating system itself can be done either through the registry or using third-party programs. Here - at will.
Internet Explorer Options
Now a few words about how to use Autoruns in terms of browser settings. In principle, based on statistics, today few users use the IE browser built into Windows or its more advanced Edge counterpart, so you can leave the settings on this tab unchecked (or delete everything at all).
Scheduled tasks, startup services, Office components, gadgets and printers
As for the scheduled tasks, it is recommended to disable only those that you know. If you do not know the purpose of the process, it is better not to touch such components at all. Services should not be experimented with either. If such a need is ripe, turn off, again, only those that you know or that are marked with threats. Tabs of drivers, codecs, providers, or in a way is better not to edit.
But the components of the launch of MS Office can be completely deactivated, since for the most part they relate exclusively to unnecessary add-ons. Finally, if you do not use print services (no printers are connected) and side panels, all the elements of the corresponding tabs can also be disabled.
And only after applying all the above settings, you can reboot the system and make sure that it starts much faster than before.
Possible errors and failures
How to use Autoruns, understood. It remains to say a few words about possible errors and the consequences of disconnecting some processes. Many users complain that sometimes it becomes impossible to roll back Windows. Apparently, this is due precisely to the disconnection of the service responsible for this. When setting up, hide the system components as described above. You can also come across complaints that the program freezes when you deactivate services like Mail.Ru Agent. In this situation, you can advise you to disable auto-start in the applet first. As a last resort, you can try to uninstall and then reinstall the program if you really need it, but was not installed as some kind of affiliate software. However, other errors are corrected by similar methods.
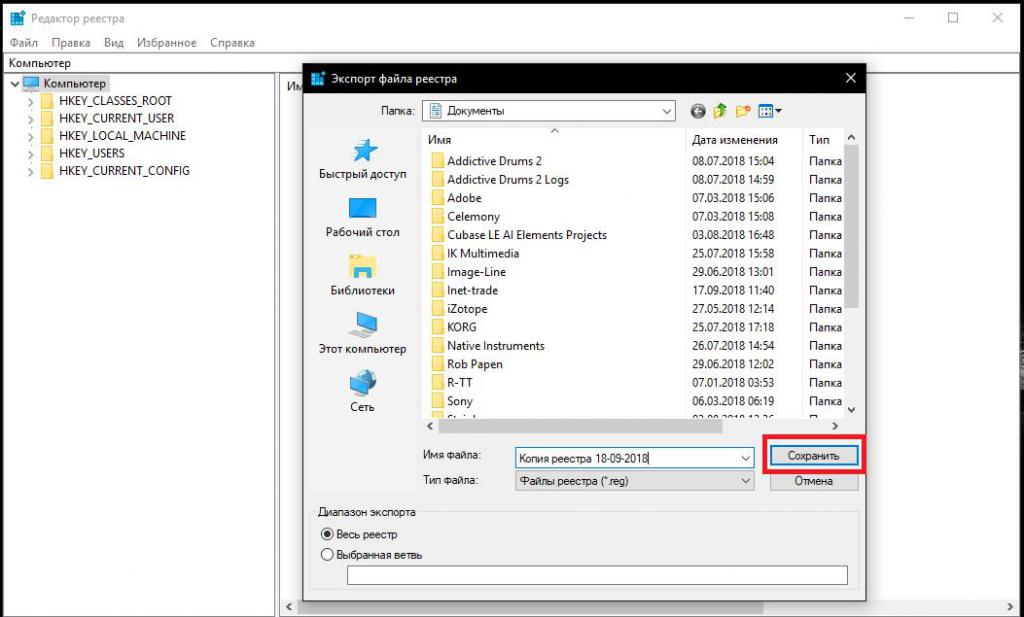
At the same time, if you want to protect yourself from the possible consequences of applying your own settings, before using the program, make at least a backup copy of the registry using the export function in the editor itself (regedit). It will be possible to restore all Windows settings from the created REG file without using automatic or manual rollback using the system tools from such a copy.