Today, Wi-Fi-based internet access can be found anywhere. Any cafe can offer visitors a free connection. To simplify the installation of optimal parameters, an application such as Connectify was developed. Setting up the program is not so difficult. At least a person who has at least once encountered Wi-Fi distribution will figure it out in a couple of minutes. The average user will not experience any special difficulties either, but there are some nuances here.
What is Connectify?
An application such as Connectify can be configured in several stages, which will be discussed now. But first, let's focus on the program itself. What is she like?
Roughly speaking, this is a software-based Wi-Fi distribution tool that allows you to literally refuse to use a router (router) by designating the Wi-Fi adapter built into the motherboard as the distribution device. As already clear, if there is none, there can be no question of using the application.
Choosing the optimal OS
Now about the most important nuance of the Connectify application. Installation and configuration with the best parameters, as evidenced by the reviews of many users and specialists, involves the use of the utility in the environment of the Windows 7 operating system.
The problem of modifying XP even with the third service pack installed is that the program simply does not work in it. In Windows 8, setting up distribution is much more complicated, because access to shared networks has to be set up manually. In addition, in the eighth version of Windows stability in the application is very difficult to achieve. There are frequent cases when a program simply “crashes” for no reason. Therefore, the Connectify setting will be considered specifically for Windows 7. In it, the application shows the maximum performance and ease of installation of the necessary parameters.
Connectify: how to install and configure the application? First steps. Where and what to download?
The first step involves installing the package. First you need to download the installation distribution kit from the official website, where two options will be offered for download: the standard free version and the Pro modification, which you will have to pay for.
Here the choice is up to the user. After downloading, run the installation file (required on behalf of the administrator) and agree to the license agreement. Further, the whole process will be performed by the “Installation Wizard”, and at the end of the process it will be necessary to reboot the system by selecting Reboot now in the final window.
Configure Connectify: Create an Access Point
After restarting Windows, an icon corresponding to the installed application will appear in the system tray. Now we directly go to the question of how to configure the Connectify program. Access to the settings is done by clicking on the icon. The main initial settings window appears on the screen, where you will need to enter the initial parameters.
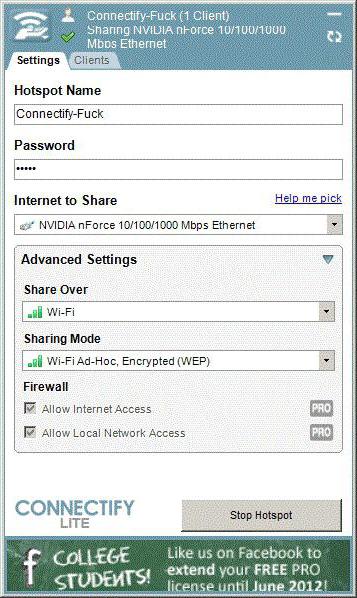
The application interface is not Russified, so we pay attention to the English names. In the Hotspot Name field, enter an arbitrary name for the future network. In this case, it is advisable not to use personal data like a surname or a name. In the next field (Password), specify your password (it becomes active only after setting the WEP Wi-Fi Ad-hoc encryption parameter in the Sharing Mode section of the distribution mode. In the Internet to share item, from the list, select the network card to which the provider's cable is directly connected. The Wi-Fi adapter is installed in the Share Over line. In the Pro version, there are two more items for configuring the firewall. However, it seems that few ordinary users will use the paid version (check boxes are set by default there), so you should pay attention, h then in the free modification of the application, these two points are inactive.
After all the parameters have been entered, it remains only to press the activation button (Start Hotspot), after which the icon for connecting to the new network should appear in the tray. Now it is completely ready for other devices to connect to it, including mobile devices.
Practical recommendations for use
As you can see, the question of how to configure Connectify to the optimal mode in the solution turned out to be completely simple. Now let's move on to some other useful features.
The main advantage of this application is that it has special means of control of all client devices currently connected to the created network. To display full information on them, you just need to enter the Clients section. There you can see a list of all MAC addresses. In addition, the Services section contains complete information about connection speed, traffic usage, active adapters, information about inactive primary and secondary devices, etc. In the History menu, you can view the history of connections, as well as analyze all data related to connected devices or users.
But that is not all. The program is indispensable when working with Yota devices and connections based on 4G technology. The fact is that the device itself can already be identified as a network card, so in the free version of Connectify such a device works without problems at all. However, some experts recommend that you do not install updates from time to time for the main application, as this may cause some communication problems. But when using Yota, you can quite simply play with relatives at home on a local network in multi-user mode.
Conclusion
That, in fact, is all that relates to how Connectify is configured for optimal mode. As can be seen from the foregoing, the setup process is reduced to just choosing a few basic parameters and, in comparison with the same wireless network setup using the Windows operating systems, it looks so simplified that even an ordinary user who is completely far from understanding Wi-Fi-based distribution needs to fill out necessary fields and set the recommended values of labor parameters will not be.
Naturally, this software is constantly being improved, but so far there is no consensus on the advisability of installing all kinds of updates or even new versions among experts and ordinary users.