Solid-state drives in the form of SSDs, which replaced the old hard drives, were increasingly used in standard PC assemblies and gained unprecedented popularity, because they are a cut above the speed of their old counterparts. Due to faster access to them increases the overall performance of the entire computer system. But to achieve the maximum effect, it may often be necessary to optimize the SSD (in the 10th version of Windows, that’s for sure). But what is meant by optimization and how to implement it? All these issues, as well as some accompanying nuances in setting up the necessary parameters, will be further considered as detailed as possible. Immediately it is worth saying that SSDs are very picky in matters of configuration, especially on the part of the operating system, so the following steps should be performed very carefully and carefully. One wrong action - and the consequences can be completely unpredictable.
Do I need to optimize SSDs?
Quite often, you can see statements from manufacturers of this equipment and developers of Windows operating systems that changing standard settings and parameters for SSDs is not required. Unfortunately, this is far from always true. None of the existing operating systems of the Windows family has yet acquired at least some significant SSD optimization tool.
Windows 10, for example, when it is installed on such a drive, in most cases produces completely different performance indicators (indices) than expected. That is why it is necessary to change the standard parameters, despite the assurances that this should not be done. But let's see what the essence of SSD optimization is in the 7th or any other version of the system and what options can be changed to achieve maximum performance and extend the life of the drive.
Auto tuning
To begin, consider some aspects related to the main parameters that are used by default for drives of this type. Basically, the settings include the following options:
- disable defragmentation;
- deactivation of the Superfetch function;
- power optimization;
- Deactivate ReadyBoot.
Despite the parameters presented in the list, there are much more options that you can enable or disable by completely changing the settings. And about them, that manufacturers, that developers, for some reason are silent. Everything is clear with the developers - they do not recommend changing some system settings, believing that this will not work for Windows systems. This is not true. In the process of optimizing Windows for SSD, no critical changes are made to system parameters, and the affected functions can be changed without affecting the operating system.
Saving free space and installing programs
So, let's get down to practical actions. What should I pay attention to first of all? Optimizing the operation of SSDs in Windows 7 and above is worth starting with the simplest steps to install the operating systems and user programs themselves (we do not consider Windows versions below, since the use of solid-state drives for them looks completely impractical).
It is believed that the best solution is to install on the SSD only the operating system itself and heavy software packages, which during operation consume a lot of system resources, and access to applications should be done as quickly as possible. Installing less “gluttonous” applications and saving user files or documents is better on ordinary hard drives if they are used in conjunction with SSD disks (RAID arrays) or in logical partitions on the solid state drives themselves.
At the same time, the optimization of the SSD-drive has another, so to speak, undocumented nuance. Most experts agree that in order to achieve the best performance on the disk there must always be free space equal to at least one sixth of the total volume. It is also desirable to increase the reserved space allocated to the system cache.
Defragmentation Issues
Now a few words about defragmentation. It would seem that it should increase the speed of accessing the disk when starting programs by moving frequently used application files to the fastest areas of the hard disk. In the case of ordinary hard drives it is. But not with SSD! The paradox is that defragmentation is absolutely contraindicated for such drives, since it can even reduce their service life.
Thus, it becomes clear that it cannot be produced under any circumstances. But SSD optimization in Windows 7 or in any other modification of the OS concerns not only the standard process that is launched at the request of the user, but also the defragmentation of system files, which is performed in the background when the operating system starts. Disabling this function yourself will be quite problematic. How to do this, we will consider a little later when describing specialized utilities for configuring SSD parameters.
Firmware update
In matters of optimizing the SSD-drive in Windows-based systems, the firmware plays not the last, although quite often not the main role. The firmware itself (firmware) in a sense is very similar to the control programs for all the "hardware" equipment, called drivers, because it ensures the correct operation of the device. When it becomes obsolete, very often you can notice a decrease in disk performance, so it must be kept up to date, but not always.
Usually, the developers of such software for installing the firmware offer special utilities that can be downloaded from the official site along with the firmware. In some cases, it is enough to just save it to disk and reboot the system, after which it will be installed automatically. Quite often, users have to install firmware through the command line. If there is no experience with the command console, it is better to immediately read the recommendations and the procedure on the developer's resource on the Internet.
As for the practical recommendations for optimizing SSDs in Windows systems, you can give some tips:
- Before installation, copy the necessary information to another hard drive or removable media;
- pre-read the reviews about the firmware on the forums (some versions of constantly updated firmware may contain flaws and bugs);
- if the disk works normally and in normal mode, and there were no problems with functionality, do not install each new update;
- After installing the firmware upgrade, be sure to check the device’s performance using specially developed utilities.
Swap file
Optimization for SSDs of the 7th modification of the OS (or systems of a rank higher) includes a number of measures and actions regarding the page file (pagefile.sys), which is responsible for reserve disk space for the needs of virtual memory. It, regardless of the amount of RAM, it is recommended to completely disable it.
To do this, through the computer’s properties, you need to go to the performance parameters and call the virtual memory settings section, then turn off the automatic setting of the size of the paging file for the system and activate the point to disable it (line “Without paging file”). After saving the installed options, a complete restart of the system is required.
Hibernation mode
It is believed that disabling the use of this mode can create some inconvenience in the work, since with its active state the computer system does not completely turn off, and the program data is stored on the hard drive, which contributes to the quick turn on of the computer and further work with applications. True, the more programs are launched, the more disk space the hyberfil.sys hibernation file takes, and the constant change of its size (overwriting) can negatively affect the device's service life.
To optimize the SSD in Windows 10 or earlier through the “Control Panel”, you need to call up the power section and first use the power button settings (on laptops, you can access the section through the PCM menu on the battery icon in the system tray).
In the menu on the left, the corresponding item is selected, and then a hyperlink is clicked to change the currently unavailable parameters, after which the checkbox is unchecked from the point of activating this mode.
The next step in the process of optimizing Windows 10 for SSDs is to turn off the computer’s automatic hibernation.
To perform such actions on the main page of the power section, you need to go to configure the current circuit, use additional power settings, select the "Sleep" category in the window that appears, and set the values for the fields for transition to sleep and hibernation "Never."
The proposed option is somewhat inconvenient, if only because of the fact that to install the necessary options you have to constantly navigate through additional sections and menus. It is much easier to disable hibernation via the command line. You can call the console through the Start menu by entering the abbreviation cmd, but only on behalf of the administrator. If such a procedure is not provided, in Windows 10 you can use the PCM menu on the "Start" button, in which there will be two types of startup (regular and administrator). Next, the command powercfg -h off is written in the console, and the enter key is pressed. After executing this command, not only the hibernation mode is turned off, but also the file responsible for it is deleted from the disk.
Indexing
Another point related to optimization for Windows 7 SSDs and OS versions above is to disable indexing for file searches, in which an additional information record (label) is created for each object on the disk, which helps to increase the speed of searching for the desired content. Of course, deactivating indexing will slightly reduce the search speed, but it will positively affect the increase of the drive’s service life.
To disconnect, in the standard “Explorer”, you need to go to the properties via PCM on one of the disks or logical partitions, and then uncheck the indexing permission line. Such actions must be performed for all sections without exception of which the SSD-disk is divided. In the case of RAID arrays, when a regular hard drive is used as one of the disks, such actions and the logical partitions present on it are not required.
System protection
Qualitative and complete optimization of SSDs in Windows is impossible without disabling some of the protective functions of the operating system. This refers to the deactivation of the permanent creation of recovery control points in the reserved area of the disk with the permanent rewriting of the contents. Many users may object to such actions, because after such an "optimization" of the SSD-drive, returning the system to a healthy state will be quite problematic. Yes, indeed, in a sense, they are right. Nevertheless, you should not go in cycles exclusively on control points and backup copies. At the very least, a backup can be saved on some capacious removable media. In addition, you can use both installation and recovery distributions with the system tools available on them. Plus, disabling the creation of rollback points, again, is to extend the life of the disk.
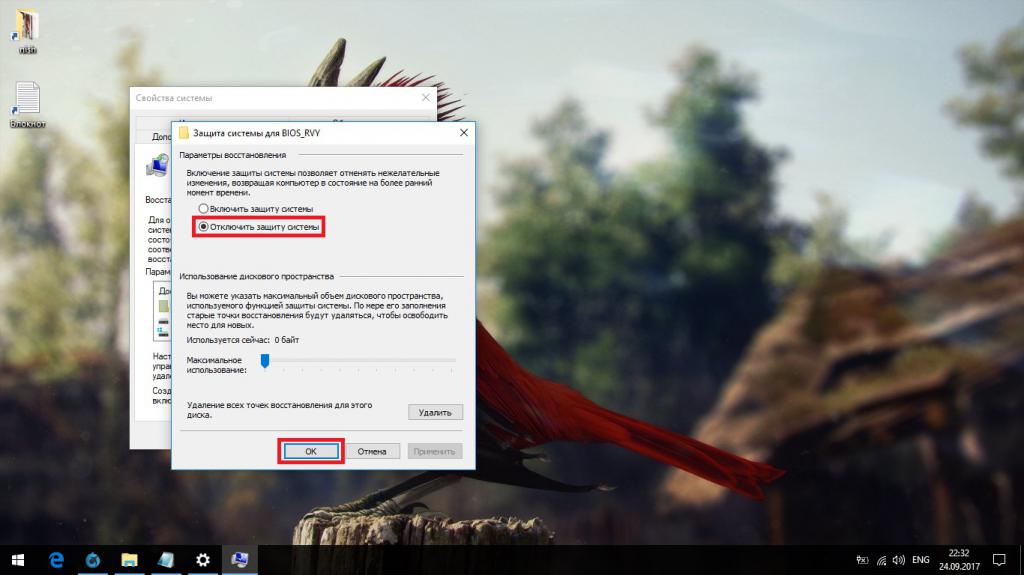
To perform this procedure, you must use the computer properties section and go to additional parameters by clicking the link in the menu on the left. Next, on the system protection tab, the change button is pressed, and in the new settings window, the line for disabling protection is simply activated, after which the changes are saved.
AHCI mode
Speaking about the optimization of SSD in the 7th or any other modification of Windows, one cannot ignore the use of the AHCI disk operating mode, the use of which can reduce energy consumption and increase the performance of a computer system. True, in this case, it should be remembered that these settings go beyond the recommended options for installation, so you will have to act at your own peril and risk. Nevertheless, most experts in the field of parameterization and SSD optimization agree that turning this mode on will not harm the disk and will have a beneficial effect on the performance of the entire system as a whole, despite some prohibitions from the manufacturers of the disks themselves and developers of management software for them or even Windows-class operating systems.
First, you should check the status of the mode for activity. To do this, use the "Device Manager". You can call it from the usual "Control Panel" through the control section (RMB menu on the computer icon) or use the "Run" console for this, in which the devmgmt.msc command is entered.
In the list of devices, you need to expand the group of IDE ATA / ATAPI controllers. Opposite the model name of your drive, there will be an annotation at the end indicating the current operating mode (IDE or AHCI).
However, the modes themselves are switched exclusively in the settings of the primary BIOS / UEFI systems (usually these are sections with names, such as IDE or SATA Configuration on the main page or in the equipment section). After setting the necessary options, do not forget to save the changes when exiting (F10 followed by pressing “Y”). Reboot on exit will follow automatically.
But not so simple. Even with AHCI mode activated, the operating system may refuse to use it due to some of its features. Therefore, to optimize the SSD in the 10th or in versions of Windows below, you need to correct the values of some registry keys. You can enter the editor through the "Run" menu, entering the abbreviation regedit. If there is no entry point below as an administrator, it can be performed through the PCM menu after a search or run the executable file of the same name from the System32 directory, again with administrator rights.
Here we need the HKLM branch, in which through the SYSTEM and CurrentControlSet sections you need to go down to the Services directory, which has several subsections. You need to change the keys below by assigning the specified values:
- iaStorV subsection - Start parameter (value "0");
- subsection storahci - Start parameter (value "0");
- iaStorAV \ StartOverride subfolders - parameter "0" (value "0");
- subfolders storahci \ StartOverride - parameter "0" (value "0").
To apply the installed options and complete the optimization of the SSD, be sure to completely reboot the system. Otherwise, the set values will not give any effect.
Feasibility of deactivating ReadyBoot, Prefetcher, and Superfetch services
Optimization of SSD in Windows 7 and later modifications of the operating system implies the performance of some operations with the above services. They are considered together, since they are directly related to each other. As for the advisability of their deactivation, the first two can be turned off, since the active Superfetch service does not have any effect on the process of writing information to disk. But, so to speak, just in case, you can get rid of it. By the way, deactivating the ReadyBoot component, which is a kind of addition to the Prefetcher service, will not give much performance improvement (unless it slightly reduces the time it takes to write data to disk).
You can deactivate Superfetch in the services section (services.msc in the execution console). By double-clicking, it is necessary to enter the editing of options, the corresponding button to stop the service and set the value in the field of the startup type "Disabled".
Two other services can be deactivated in the registry. By the way, for the Superfetch component, you can also apply such a method (perform all actions in one place - the registry editor). To access the necessary parameters, use the HKLM branch.
, Superfetch Prefetcher (Ctrl + F) PrefetcherParameners. :
- EnablePrefetcher – «0»;
- EnableSuperfetcher – «0».
: , ( DWORD) .
ReadyBoot Autologger ( ReadyBoot, ). Start, . , .
Note: before making any key editing, it is strongly recommended that you back up the registry through the export function. If necessary, from such a copy it will be possible to restore a working system if something goes wrong. In extreme cases, you can also record a disk image with the operating system and all installed applications by placing it on an external medium (for example, a USB-HDD). It will not be worse from this, and a fully functional copy will always be at hand, restoration from which will take only a couple of minutes.
SSD Mini Tweaker SSD Optimization Program: What can I do with it?
Finally, consider a small automated utility specially designed to manage the settings and parameters of SSDs of any manufacturer. In principle, there isn’t much difference whether this program will be used to optimize SSDs in the 10th version of the system or in the modifications below. It works without problems in any of them.
Everything is extremely simple here. After launching the application, a settings window will appear, in which it is necessary to check all the automatic settings points or use manual mode, then press the button to apply the settings. Upon completion of the application, a reboot of the computer system is required.
In the presented list, one of the most interesting is the Trim function. In order not to delve into technical terms and engage in a detailed discussion of the mechanisms of its operation and use, a very simple explanation can be given for the average user. The fact is that in normal operation, when a file is deleted, it is not deleted from the disk as such, and when another object is saved in the same disk cell, it is overwritten on top of the existing deleted file. The Trim function allows not only the complete removal of unnecessary objects, but also remove them from the logical sectors. Roughly speaking, cells that may contain deleted files are cleared immediately.
SSD Fresh App
According to the operating principles, this program for optimizing SSD media is very similar to the previous utility, but differs only in a more interesting interface and display of the optimization level indicator in real time, although many experts are inclined to think that it is very conditional. This is somewhat reminiscent of the calculation of the performance index, which can be found in the Windows-systems themselves and which also does not fully reflect the true state of the computer device.
Nevertheless, to optimize the SSD in Windows 10 or earlier systems, it makes sense to use it, especially since to set automatic settings you need to click only one button, and the program will optimize the necessary options on its own.
Additional measures
It is believed that all that has been described above is enough to set the optimal settings for solid-state hard drives. However, as additional solutions, you can use a couple more settings. So, for example, you can transfer the application cache (mainly Internet browsers) to another drive without increasing its size on the SSD drive. Using conventional hard drives for this is extremely unreasonable, since we still need acceleration. In this situation, the use of special RAM disks looks like a good option (a volume of 1 GB will be quite enough).
Also, to optimize SSDs, you can disable the use of USN logging for NTFS file system, which records file change tracking.
Finally, you can transfer TEMP temporary storage folders related to variable environments from SSD-drive to a regular HDD-hard drive, the parameters of which after performing such operations will have to be set independently, indicating the appropriate location of the transferred objects.
Brief conclusions
That, in fact, is all that concerns all the steps that you will need to go through to set the optimal options and parameters for solid state drives. Do not be confused by the moment that the description of the installation of the necessary parameters sometimes mentioned ordinary HDD hard drives that can work in conjunction with SSD-carriers in the form of RAID-arrays. Using them is completely optional. As mentioned above, a RAM disk is quite enough, especially since their price is acceptable for an ordinary user. The same models from Samsung are quite inexpensive.
It goes without saying that all the solutions related to optimization were presented here, but some components like ReadyBoot or Superfetch, by and large, may not be touched, since they do not particularly affect the state of the disk, its performance or the prolongation of its useful life. This, as they say, is just in case of fire.
Well, as for the optimization process itself, here is a choice. If you do not want to engage in manual settings, no one forbids using automated utilities. But for those users who want to study all the processes of setting the optimal parameters for SSD more deeply, of course, it is worth going through all the steps of the setting yourself. There will be no harm from this, despite the time spent, and knowledge can be useful in the future.
And of course, the two programs reviewed are far from unique. If you delve deeply into the Internet, you can find a great many such utilities, and some manufacturers of solid-state drives put such utilities on their sites for free download.
In conclusion, it is worth saying that the above solutions to optimize the operation of SSD-carriers, increase the speed of the entire system as a whole and extend the life of the disk are just recommendations, not dogmas. Naturally, it is worth using them in practice, but you can do without it, leaving the parameters set by the manufacturer as is.