If suddenly the question arose about organizing a home network or simply connecting a computer to a router, modem or other device, but there is no way to call the wizard, do not get upset. In computer stores, you can freely buy ready-made cables (patch cords) with various types of connectors already connected. If there is no such store nearby, or if you want to lay the cable in places where the connectors will not pass, you will have to crimp the cable yourself.
To do this, you will need basic knowledge in the field of electronics, as well as a certain type of cable, connectors, tools in the form of crimping pliers , a tester, a screwdriver and a knife. But before proceeding with the installation, we will try to figure out what it is intended for, how it works, how to compress the network cable with our own hands.
Cable
In standard local area networks, it is customary to use a conductor called “twisted pair”. He owes his name to the internal device, consisting of two, four or eight insulated copper or aluminum conductors, twisted in pairs and enclosed in an external PVC insulation. The shell of each wiring for ease of connection is made in different colors. There are two types of such cables: shielded with a surrounding layer of foil (FTP) and unshielded (UTP).

It is not practical to use FTP-conductor for arranging a home network, since the screen is designed to protect against strong electromagnetic interference, as well as for a working cable length of more than 100 meters. So a cheaper and more common option in the form of a UTP cable sold in any computer equipment store or on the market is quite suitable. Any twisted pair cable is divided into several categories depending on the number of cores, throughput and destination. The cable is marked with a combination of letters and numbers: from CAT-1 to CAT-7. The most common conductor for the equipment of local networks is CAT-5 or its modification CAT5e. It consists of four pairs of multi-colored cores and provides data transfer up to 100 Mbit / s at a frequency of 100 MHz.
Connectors
All modern computer equipment, designed for widespread use, for network connections has standard standard connectors for the plug marked 8P8C. Sometimes this connector is for some reason called RJ-45. But no matter what they are called, their purpose is the same - to connect a “twisted pair” with any device. These plugs, like the cable, can be shielded or not. The connector is a plastic head with eight grooves cut into it for laying conductor wires. At the end of these slots are mounted movable contacts, which clamp the wires. During installation, the numbering of the grooves is very important. If the connector is placed with the contacts up and to the latch, then the first will be on the left and the eighth contact on the right.
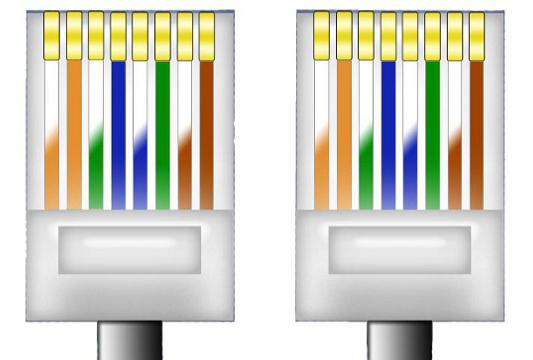
Network cable crimp diagram
There are two known options for the location of the twisted pair cores in the connectors:
- EIA / TIA-568A.
- EIA / TIA-568B.
The first provides the following sequence (from left to right):
- White-green.
- Green.
- White-orange.
- Blue.
- White and blue.
- Orange.
- White-brown.
- Brown.
In the second circuit, the wires are arranged as follows:
- White-orange.
- Orange.
- White-green.
- Blue.
- White and blue.
- Green.
- White-brown.
- Brown.
Connection types
The EIA / TIA-568A variant is used to crimp a network cable that will be connected at one end to a computer and the other to one of the switching devices (router, switch, modem, etc.). This type of connection is called direct. But there is another - cross or cross. It is used to connect two computers directly. Direct crimping of the network cable provides for fastening the connectors according to the EIA / TIA-568A scheme from both ends. This is the most common type of connection, since usually in local networks more than two computers are used, connected via microwave or other types of switches. If nevertheless there is a need to connect two machines between each other, then cross-connection is used. In order to crimp a computer-to-computer network cable, one end of the cable should be connected to the connector using EIA / TIA-568A technology, and the other - according to EIA / TIA-568B. For a direct connection, not all 8 cores can be used, but only 4, but the data transfer rate will decrease by 10 times. With cross connection, all 8 cores are used.
Cable preparation
Before crimping, the conductor must be stripped of insulation. You can cut the cable with an ordinary knife, but the performance of our patch cord and the quality of data transfer will depend on how carefully this is done. The outer insulation is cut at a distance of 20-25 mm from the end. It is important not to damage the insulation of the cores, which may subsequently lead to their closure. After the insulation is removed, it is necessary to untwist all the pairs and straighten them in the order of EIA / TIA-568A or EIA / TIA-568B, depending on the type of connection required.
How to crimp a network cable with a crimper
Masters use special pliers (crimper) for crimping the cable . If such an instrument was not found at home, you can buy it in any store where they sell radio components. The cost of the simplest crimper is about 200 rubles. Before crimping the network cable, you must make sure that the wires do not intersect each other.
Next, insert them into the grooves of the connector until they stop and fix. Visually, you should make sure that all the wires rested on the front wall of the head of the plug, none of them accidentally fell into the “alien track”, and that the crimping circuit was not broken. After that, the connector is placed in a special crimper working socket, made in the shape and size of the connector, and clamped until it stops. Such an operation is also being done with the other end of the future patch cord. You can check the correct connection by the LAN tester, and for lack of such, simply connect the computer to the desired device via a compressed network cable.
Cable crimp without crimper
If you still haven’t found any special pliers, and there is no way to buy them, there is an option how to manually compress the network cable. Good vision and a thin screwdriver or knife come in handy here. Having cleaned the “twisted pair” from the outer insulation and having laid out its veins in the necessary order, we place them in the connector and again we fix with our fingers. The plug must be with the contacts up.
Having rested the lower part of the connector on a table or other horizontal surface, it is necessary to move them one by one with a screwdriver or a knife down all the way down. In this case, the contact teeth will cut the insulation of the wires and fix them in the lower position. When buying connectors and planning to crimp them manually, it is better to take a few extra ones, because the first time it may not work, and you will have to run to the store again.
Common mistakes
When crimping a cable, situations often arise when everything seems to be done correctly, but there is no connection. In this case, it is necessary to verify the layout of the cores and recheck it for compliance with the type of connection.
If everything is correct, you need to make sure that all wiring is securely connected to the connector pins. It is also possible that the upper insulation is too cut off, and the veins of the patch cord, twisting, can be closed or, conversely, move away from the contact. In such cases, cut the cable and crimp again.