NET Framework is a software platform developed by Microsoft. With its help, programs and applications are created, so the presence of this package on a computer running Windows is mandatory. Everyone knows that for the correct launch of some applications, you must install this product. Now we’ll figure out how to remove the NET Framework in different ways.
All removal methods
In this article, we will consider all removal methods in the form of step-by-step instructions. You can choose the option that suits you best and quickly get rid of the software.
Why remove it? It's simple: to then install a new version or get rid of a conflict with other software or hardware. So, you can uninstall the program in the following ways:
- standard Windows utility;
- third-party applications to remove programs ;
- service shutdown.
Consider how to remove the NET Framework in each of the described ways.
Standard utility
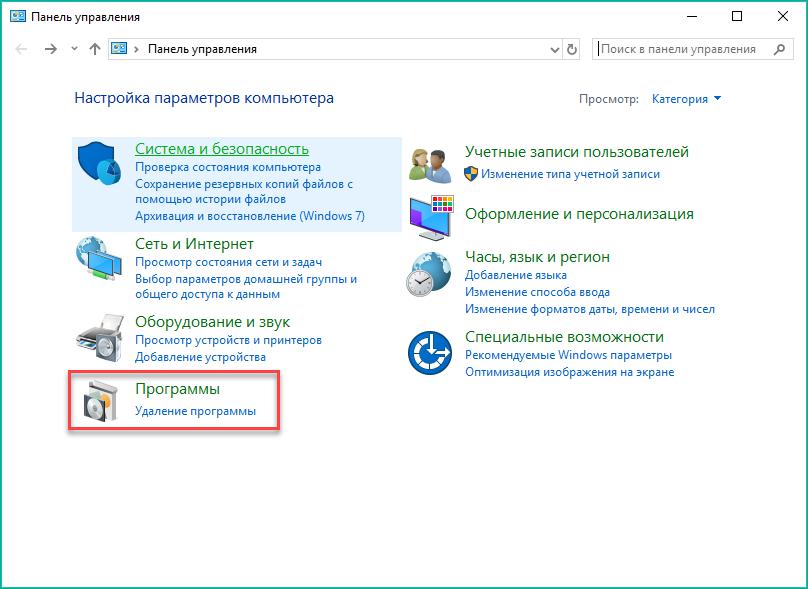
To remove this method, you must use the standard application "Add or Remove Programs." To open it, follow these steps:
- Open the Control Panel. This can be done through the search bar on the taskbar, through the "Start" menu, or by clicking on the start icon and selecting the corresponding item.
- Select the Category view and open the Programs section.
- Now in the "Programs and Features" section, click on the "Uninstall a program" button.
- Find the line with the name of the program in the list and right-click on it. Then select "Delete / Change."
- In the window that opens, select the second item and click "Next."
- Now follow the instructions in the installer window.
Done! It remains only to restart the PC and check the operability. We remind you that after uninstallation, many applications may stop functioning. However, this method is only suitable for versions of Windows 7 and below, since it is in this version that the NET Framework OS appears in the list of installed programs. In Windows 8 and 10, older versions of the application are built into system files, so you cannot delete them, but you can disable them (more on that below).
Now you know how to remove Microsoft NET Framework using standard Windows operating system tools. Let's move on to the second method.
Third party program
Many people use different programs from third-party developers to clean PCs from unnecessary utilities. For example, CCleaner. In it you can clean the registry, cache files, as well as delete unnecessary software. Open the program and follow the instructions:
- Go to the "Service" section.
- Open the "Uninstall a program."
- Find the line with the NET Framework and click on the "Uninstall" button on the right side of the window.
- Follow the removal instructions.
This option is also appropriate when using the operating system Windows 7 and earlier. Now let's turn off the service in Windows 8 or 10.
Shutdown
Since it is not possible to remove the NET Framework in Windows 8 or 10, you need to do this:
- Open the Control Panel and go back to the Uninstall Programs application.
- In the left column, select "Turn Windows features on or off."
- In the list you will find lines related to the NET Framework. Remove the marks in front of them and confirm the decision with the OK button.
Now you know how to remove the NET Framework in Windows 7 and how to disable this service in Windows 8 and 10.
Tip
After a complete removal, you need to install a new version. It is recommended to download it only from the official site. You can find the file you need on the Microsoft website in the appropriate section.
To prevent Windows from downloading new versions for the NET Framework, you can turn off automatic updates in the operating system settings.
To restore performance without a complete removal, you need to use the Repair Tool utility.