Squid is a widespread solution among programmers, system administrators and computer network enthusiasts for creating an effective proxy server and managing it. The program is especially attractive in that it is cross-platform. That is, you can install and run it both on Linux and other OSs corresponding to the Unix architecture, and on Windows. The capabilities of this tool are the most outstanding. How can they be used? Are there any features in setting up the program depending on the specific OS?
Squid Overview
What is squid? Under this name, a particularly productive proxy server is most often used with web clients. With it, you can organize simultaneous access to the Internet for several users. Another notable feature of Squid is that it can cache various requests. This allows you to speed up the receipt of files, since you do not need to download them again from the Internet. Squid proxy server can also adjust the speed of the Internet channel when correlating it with the actual load.

Squid is adapted for use on Unix platforms. However, there are versions of Squid for Windows and many other popular OSs. This program, as well as many operating systems based on the Unix concept, is free. It supports HTTP, FTP, SSL, allows you to configure flexible control over access to files. Squid also caches DNS queries. At the same time, you can configure a transparent Squid proxy, that is, the server’s operation in a format where the user does not know that he is accessing the Network through it, and not directly. Thus, Squid is a powerful tool in the hands of a system administrator or communications service provider.
The practical utility of Squid
When can Squid be most useful? For example, this may be a task in which it is necessary to carry out the effective integration of several computers into a network and provide them with Internet access. The advisability of using a proxy server in this case is that requests between it and the browser of a specific PC are faster than in the case of user interaction with the Internet directly. Also, when using Squid, the cache in the browser itself can be completely disabled. A similar feature is very popular among users.
Squid Composition
The solution in question consists of several components. This is actually a software package. In its structure is the application with which the server is launched, as well as the supplementing program for working with DNS. An interesting feature of it is that it launches processes, each of which functions independently of the others. This allows you to optimize server interaction with DNS.
Program installation
Installing Squid usually does not cause any difficulties. The Linux program is very easy to install: just enter the command $ sudo apt-get install squid.
As for Squid for Windows, things are a bit more complicated here. The fact is that this program does not have executable files - the main elements of applications for Microsoft OS.
However, installing Squid on Windows is a task that can be solved quite quickly. You need to find a distribution kit on squid-cache.org or its relevant resources that contains .bat files that are somewhat close to the traditional Windows executables. After that, copy them to a separate folder on the disk. Then you need to start Squid as a system service. After that, the program can be used as a proxy through a PC browser. We can say that Squid installation is now complete.
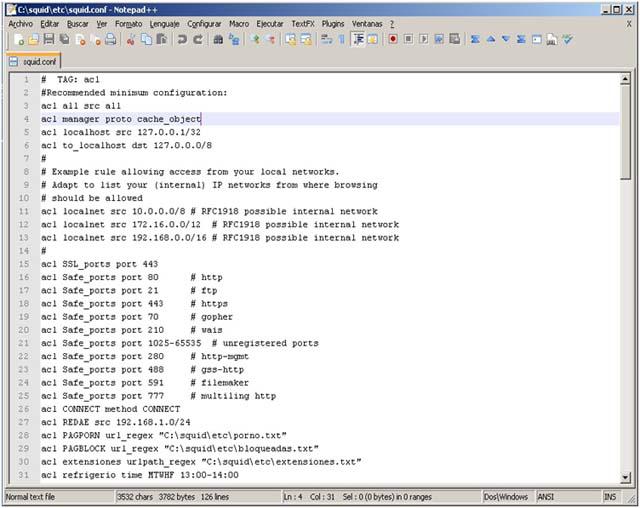
A proxy server distribution almost always contains a configuration file such as .conf. It is the main tool for setting up Internet access from a user's computer and other devices connected to a local network when Squid is enabled.
Settings Nuances
What nuances may include setting Squid? Windows is an operating system in which work with a proxy server will be carried out by editing configuration files.
In the case of Linux, you can use the command line for some procedures. But in general, in this operating system, as well as in the case where the OS in which Squid is configured is Windows, the squid.conf file is most often used. It defines certain expressions (“commands”), according to which the server manages network connections.
Consider, in this way, how to configure Squid, in more detail. The first step is to allow network users access to the server. To do this, set the squid.conf file to the appropriate values in http_port, as well as in http_access. It would also be useful to create an access control list or ACL. The http_port settings are important to us, since our task is to prepare Squid only for servicing a specific group of computers. In turn, such a parameter as http_access is important, because with it we will be able to regulate access to specific resources of the Network requested from various addresses (other criteria are possible - protocols, ports and other properties contained in the ACL).
How to set the necessary settings? It is very easy to do.
Suppose we created a computer network with a range of addresses starting with 192.168.0.1 and ending with 192.168.0.254. In this case, the following parameter should be set in the ACL settings: src 192.168.0.0/24. If we need to configure the port, then in the configuration file we need to record http_port 192.168.0.1 (just specify the correct IP address) and enter the port number.
In order to restrict access to the proxy created using Squid (not counting computers on the local network), you need to make changes to http_access. This is done simply — with the help of expressions (“commands”), we agree to call them that, although, strictly speaking, they are not such in the text, but in the terminal line they would completely correspond to them) allow LocalNet and deny all. It is very important to place the first parameter above the second, as Squid recognizes them in turn.
Working with ACLs: Denying Access to Sites
Actually, access settings are possible in Squid in a very wide range. Consider examples of useful LAN management practices.
The src element is quite in demand. With it, you can fix the IP address of the computer that made the request to the proxy server. Combining the src element with http_access, you can, for example, allow access to a network to a specific user, but prohibit similar actions for everyone else. This is done very simply.
We write the ACL (name of the user group) src (the range of IP addresses that fall under regulation). The line below is the ACL (name of a specific computer) src (IP address of the corresponding PC). After that we are already working with http_access. We set permission to enter the network for a group of users and an individual PC using the http_access allow commands. On the line below, we fix that access to other computers on the network is closed by the deny all command.
Setting up a Squid proxy also involves the use of another useful element provided by the access control system - dst. It allows you to fix the IP address of the server to which the proxy user wants to connect.
Using this element, we can, for example, restrict access to a particular subnet. To do this, you can use the ACL (network designation) dst command (subnet IP address), the line below is http_access deny (the name of a specific computer on the network).
Another useful element is dstdomain. It will allow us to fix the domain to which the user wishes to connect. By using this element, we can limit the access of a user, for example, to external Internet resources. To do this, you can use the command: ACL (group of sites) dstdomain (site addresses), the line below is http_access deny (the name of the computer on the network).
There are other notable elements in the structure of the access control system. Among them - SitesRegex. Using this expression, you can restrict user access to Internet domains containing a specific word, such as mail (if the task is to prohibit company employees from accessing third-party mail servers). To do this, you can use the ACL SitesRegexMail dstdom_regex mail ACL command, then the ACL SitesRegexComNet dstdom_regex \ .com $ (this means that access will be denied for the corresponding type of domain). The line below is http_accesss deny indicating the computers from which access to external mail servers is undesirable.
Some expressions may use the -i switch. Using it, as well as such an element as, for example, url_regex, designed to create a template for web addresses, we can restrict access to files with a given extension.
For example, using the ACL command NoSwfFromMail url_regex -i mail. * \. Swf $, we control the ability to access mail sites with Flash movies in their structure. If there is no need to include the domain name of the site in the access algorithms, then the urlpath_regex expression can be used. For example, in the form of the ACL media command urlpath_regex -i \ .wma $ \ .mp3 $.
Deny access to programs
Configuring Squid allows you to prevent users from accessing certain programs when using proxy server resources. For this purpose, the ACL command (program name) port (port interval) can be used, the line below is http_access deny all (program name).
Enforcing Standards and Protocols
Configuring Squid also allows the system administrator to set the preferred protocol for using the Internet channel. For example, if there is a need for a person from a specific PC to access the network via FTP, then you can use the following command: ACL ftpproto proto ftp, the line below is http_access deny (computer name) ftpproto.
Using the method element, we can specify how the HTTP request should be made. There are 2 of them - GET and POST, but in some cases it is preferable to the first, and not the second, and vice versa. For example, a situation is possible in which a particular employee should not view mail through mail.ru, but his employer will not mind if a person wants to read the news on the specified site. To do this, the system administrator can use the following command: ACL sitemailru dstdomain .mail.ru, line below - ACL methodpost method POST, then http_access deny (computer name) methodpost sitemailru.
These are the nuances that Squid tuning includes. Ubuntu is used, Windows, or another OS compatible with the proxy server - the features of setting the necessary parameters that we examined are generally characteristic of any software environment for Squid to function. Working with this software is an incredibly exciting process and at the same time uncomplicated due to the consistency and transparency of the basic algorithms for setting up the program.
Note some key points that are specific to Squid settings.
What to look for when setting up?
If you have difficulty finding the squid.conf file, which is the main server configuration tool, you can try checking the etc / squid directory.
It’s best if you use the simplest text editor when working with the file in question: you don’t need to have any formatting elements in the lines responsible for setting up the proxy server.
In some cases, it may be necessary that the proxy server of the provider be specified during operation. There is a cache_peer command for this. You need to enter it like this: cache_peer (provider proxy server address).
In some cases, it is useful to fix the amount of RAM that Squid will use. This can be done using the cache_mem command. It is also useful to specify the directory where the cached data will be stored, this is done using the cache_dir expression. In the first case, the entire command will look like cache_mem (the amount of RAM in bytes), in the second it will look like cache_dir (directory address, the number of megabytes of disk space). It is advisable to place the cache on the most high-performance disks, if there is a choice.
You may need to specify computers that have access to the proxy server. This can be done using the ACL allowed hosts src commands (interval of IP addresses of computers), as well as the ACL localhost src (local address).
If SSL type ports are involved in the connections, they can also be fixed using the ACL ssl_ports port command (port indication). At the same time, you can prohibit the use of the CONNECT method for other ports except those specified in a secure SSL connection. The expression http_access deny CONNECT will help you do this! SSL_Ports.
Squid and pfSense
In some cases, together with the proxy server in question, the pfSense interface is used, which is used as an effective firewall. How to organize their joint work? The algorithm for solving this problem is not too complicated.
First, we need to work on the pfSense interface. Squid, which has already been configured by us, will need to be installed using SSH commands. This is one of the most convenient and safe ways to work with proxy servers. To do this, activate the Enable Secure Shell item in the interface . In order to find it, you need to select the System menu item, then Advanced, then Admin Access.
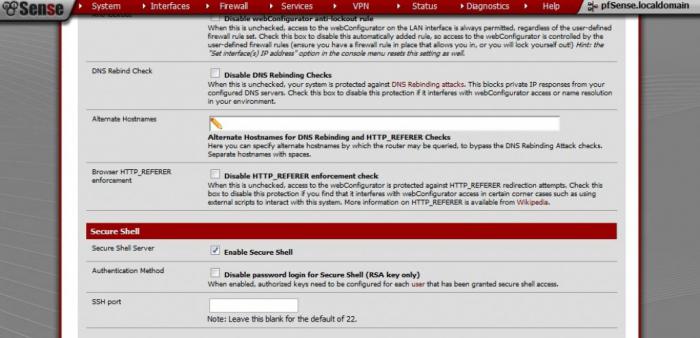
After that you need to download PuTTY - a convenient application for working with SSH. Next, using the console, you need to install Squid. This is easy to do with the -pkg install squid command. After that, you must also install the proxy through the pfSense web interface. Squid (its parameters are not configured at this stage) can be installed by selecting the System menu item, then Packages, after - Available Packages. The Squid Stable package should be available in the appropriate window. We select it. The following settings must be set: Proxy Interface: LAN. Next to the Transparent Proxy line, you can check the box. We select the address for the log and mark the Russian language as preferred. Click Save.
Resource optimization tool
Configuring Squid allows system administrators to efficiently distribute server resources. That is, in this case we are not talking about prohibitions of access to any site, however, the intensity of the channel being used by one or another user or their group may require control. The program under consideration allows us to solve this problem in several ways. Firstly, it involves the use of caching mechanisms: due to this, re-downloading files from the Internet is not required, as the load on traffic will decrease. Secondly, this is a limitation of network access over time. Thirdly, the establishment of limit values for the speed of data exchange on the network in relation to the actions of certain users or specific types of downloaded files. Consider these mechanisms in more detail.
Optimizing network resources through caching
In the structure of network traffic there are many types of files involved unchanged. That is, once downloading them to a computer, the user may not repeat the corresponding operation. Squid allows flexible configuration of the server’s recognition of such files.
A fairly useful option of the proxy server we are examining is checking the age of the file in the cache. Objects that have been located in the corresponding memory area for too long should be updated. This option can be enabled using the refresh_pattern command. So, the whole expression may look like refresh_pattern (the minimum length of time is in minutes, the maximum proportion of “fresh” files is in%, the maximum period). Accordingly, if the file is in the cache for longer than the specified criteria, then you may need to download its new version.
Resource optimization through time-based access restrictions
Another option that can be used thanks to the capabilities of Squid-Proxy is to limit the time users have access to network resources. It is installed using a very simple command: ACL (computer name) time (day, hour, minute). Access can be limited for any day of the week, substituting instead of “day” the first letter of the word corresponding to its name in the English alphabet. For example, if it's Monday - then M, if it's Tuesday, then T. If the team does not have the word “day”, then the corresponding ban will be set for the whole week. Interestingly, it is also possible to adjust the schedule for entering the network, carried out by users using certain programs.
Resource optimization through speed limits
A fairly common option is to optimize resources by adjusting the permissible data exchange rate within a computer network. The proxy server we are studying is the most convenient tool for solving this problem. The speed of data exchange in the network is regulated using parameters such as delay_class, delay_parameters, delay_access, and also through the delay_pools element. All four components are of great importance for solving the tasks facing system administrators in terms of optimizing the resources of the local network.