Any web development user probably knows, or at least has heard of Denwer. For those who are faced with this concept for the first time, I will consider basic definitions, if not complete, then at least for a partial understanding of what Localhost Denwer and related components are. Also, a little deeper into the issues of installation, configuration and solutions to the most common problems and errors in this software shell.
What is Denwer?
Let's start with the most important thing. If you understand, the very concept of “Localhost Denwer” (local host Denwer) can be interpreted (naturally, not verbatim) as “a tool for creating and working with a server created on your own computer using a special set of tools without using a remote resource”.
This domestic development was born in 2002, thanks to the efforts of three people: Dmitry Koterov, Anton Suschev and Mikhail Livach, although the idea of creating such a universal shell that would include a complete set of tools for creating and debugging sites with their subsequent placement on hosting.
Not surprisingly, this package is sometimes interpreted in the form of the abbreviation "DNR", which means "a gentlemanly set of web developers." In fact, the way it is, since the main set includes a lot of all kinds of means, although you can also find truncated (lite) versions.
The advantage of this package is that it allows you to create local servers, and without their initial placement on remote resources. In principle, all information can even be written to a regular flash drive, and in which case you can edit or deploy to another computer.
Basic software package
As already clear, the package consists of several basic components that allow you to perform almost any task:
- installer;
- Apache-based server
- PHP 5 shell
- MySQL5 platform;
- phpMyAdmin database control element for working with them using browsers;
- emulation tool for SMTP server and sendmail (simulator of sending email).
However, in order to achieve the full functionality of Localhost Denwer, a special engine will have to be added here. The most common and most popular are Joomla and WordPress. But first things first.
Denwer Installation
One of the basic questions from which you should start familiarizing yourself with this program is installation. As a rule, installing Denwer on a local computer terminal or laptop is straightforward.
After starting the installer, the browser will immediately open (it is not needed, the window can be closed) and the unboxing window by the type of DOS mode. The user will be prompted to press “Enter” to continue. Push.
Further, the installation program suggests specifying a place on the hard drive where all files and data will be stored (by default, this is WebServices directly on the system drive “C”, but you can create, for example, the Server folder, again in the root of the system partition).
At the next stage, you need to select the letter of the virtual disk. The installer suggests creating a Z partition. If the system does not have such a partition. We agree and continue.
Now the process of copying files is activated, after which you need to select the mode for the virtual disk:
- creation at computer startup;
- creation when the program is called.
Here - at its discretion. In principle, if the active virtual partition will be used infrequently, you can choose the second option. This completes the main part of the installation.
Health Check
Naturally, after installing the local server, it is mandatory to check it for operability. On the desktop after the installation is complete, three shortcuts will be created: Start, Stop and Restart. We start the server.
After that, a virtual disk appears (if activation was selected during installation during an explicit call), and in the system tray - two icons with the image of a pen and a hat.
Now open the browser and enter http: // localhost or just localhost in the address bar. Denwer in the same browser displays a message that everything worked. If you go down a little lower on the page, you can see links that can be used to test server functionality, as shown in the picture below.
If, as a result of clicking on each separately taken link, different pages appear, then all the components work as usual.
Encoding Issues
Sometimes, however, localhost Denwer does not start to send e-mail or the message looks like strange characters. This is due to the fact that initially the program uses UTF-8 encoding. But you need to check the shipment.
To do this, use the last link from the above list. After clicking on it in the text box you need to write something (preferably in Russian) and send the message.
Now you need to make sure that it is delivered. To do this, check the! Sendmail folder, which is located in the tmp directory in the virtual partition (Z), and also do the same for the physical disk where the shell (C) was installed. Why localhost does not start (Denwer, Windows 7 as the main OS) will be discussed separately.
Install and configure the engine
The next step is to install the engine. To do this, first check the presence of the www directory located on the system drive by the path Server folder (default WebServices) \ home \ local host. In the www folder you now need to create another directory (think of the name you like), say Probe.
Further, Denwer configuration involves restarting the program using the Restart shortcut. After that, enter http: // localhost / Probe in the address bar of the browser. If this page opens, then everything is done correctly and the work is not satisfactory. Now it's up to the small. We copy the engine files to the created folder (we have Probe) using any file manager, and then repeat the procedure for entering the above address in the browser. The Installation Wizard window should appear, where you just need to follow its instructions.
Database creation
Since the engine in this case acts as a local hosting (localhost) Denwer also involves the creation of a local-level database. You will already need the phpMyAdmin program, which can be accessed using the address in the browser http: // localhost / tools.
In the horse, click on the link with the name of the application and select the line for creating a new database. You can call it anything you like. But, in order not to get confused, it is better to use the folder into which the engine was installed (Probe).
Now we return to the main page and use the line with privileges (after entering the menu you need to add a new user). We specify any name, username and password, for the host we use localhost, in the global privileges section we tick off everything that is, and click the “Go!” Button. The created database can be used to install WordPress or Joomla. Access to the resource upon completion of the installation, again, is carried out at the above address.
Transfer to hosting
Now we need to transfer the server to the hosting. To make it accessible to surfers on the Internet. But first you need to pay attention to some conditions. First of all, you need to have not a dynamic, but a static IP address. You should also completely disable the Windows firewall, which can block access), and also configure the so-called hierarchical folder structure, that is, in the home directory home, first create the folder XXX.XXX.XX, and in it the subfolder www (instead of the address characters, the address provided by the provider should be indicated).
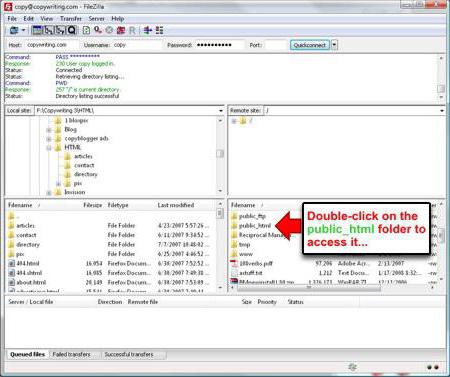
You can do differently. To transfer files, we use the FileZilla application, with which we move all the files of the local server from the Probe folder that we worked with in the setup process to a remote resource, but to the root folder of the host (as a rule, this is either HTDOCS or PUBLIC_HTML). Then it remains only to change the absolute paths to files and folders on the remote host in the settings of the engine configuration file, as well as change the database name and user name with password to those that will be used when creating a new database already on the remote resource.
Denwer does not open, localhost is unavailable: causes and methods of solving the problem
Now we turn to pressing issues that are associated with server inoperability.
So Denwer is not working, localhost is not available. The reason is that many, after installation, immediately try to access the browser, forgetting to run the program itself. Only the localhost line should be typed in the address bar , and not something with, say, with the addition of .ru, .com or something else.
Another reason is port blocking : 80 and: 443 by third-party programs (most often Skype hangs on port 80 and Torrent or VMWare virtual machine on port 443, if any). The solution is quite simple - change the port priorities in these applications. For example, in “Skype” you need to remove the “bird” from the line using the specified ports as alternative.
An equally common problem is the lack of a www folder in the main section. For example, if initially the folder hierarchy was created in the form of server \ localhost or in any other form, you should check the home folder, where the specified directory should be located.
Sometimes the HOSTS file may be locked by an antivirus (in most cases, this is Dr. Web). For correction, it should be included in the list of exceptions. You can first create a backup copy of it, delete it, check if the program starts, and then return the file to its original location.
It may well be that the application should be launched either in compatibility mode or with admin rights (right-click menu).
If the connection fails, the system may have an outdated version of MySQL that you need to get rid of. Sometimes the port may be blocked: 3306 (you should find out what kind of application it is using and change the settings).
And remember! The Denwer program itself does not broadcast absolutely anything on the Internet, and is just a tool and, if you like, an assistant for carrying out a particular operation to create a server and process it.