The main purpose of fishing knots is to maximize the performance of its functions related to the quality of tying the fishing line to a hook, tying the fishing line with a fishing line or a braided cord, and reliable tying of a wobbler or other lures. We suggest learning how to tie a cord to a cord, a hook to a cord, etc.
Double Uni Knot Node
This type of fishing unit is the most popular and durable. We can safely say that he is one of the best. It can be mastered by anyone, even a novice fisherman, thanks to a simple tying technique. But, despite this, its strength will never let you down. This knot can be connected with each other and two fishing lines, and two cords.
So how to tie the cord to the cord? We take the free ends of the braided cords and put them together. Next, around the cord, which we will tie, make 3-4 turns with the free end of the second cord, then tighten them. Now do the same with the free end of the cord to be tied around the second. After that we tighten the turns. You should get two nodes: one on each cord. Now it remains only to pull them at the ends in different directions, thereby fixing the formed node. If the result is too long ends, then they should be trimmed. Here is the knot and ready.
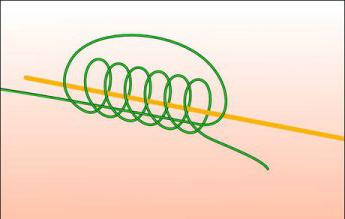
Counter Eight or Flemish Knot
There is another method for tying a cord to a cord. We are talking about the Flemish knot, which acts as an easy, and most importantly, reliable way to connect two lines or cords between each other. It can not only be easily tied, but also visually checked.
So, how to tie such a knot? First you need to tie a regular knot on the same cord called the "eight". We do the same on the other side of the second cord, while starting to knit parallel to the main cord. The eight must be tied so that the two extreme turns are separated from the two cords crossing them and are pulled inward relative to the neighboring ones.
It is very important in tying the knot that, being under load, it should not change its structure. Even when the loop is under tension. If a critical load is expected, then the ropes used should be almost the same diameter, and for safety, the ends should be left long. You can also protect yourself and tie a double locking running knot around each end of the cord around the root end.
Knot Albright
How to tie a cord to a cord? There is another way, in addition to the above, for tying two cords. Let's consider the technique of the Albright Knot node . So, we unwind one or two meters of a cord from a plastic, factory spool. You need to pay attention to the fact that at the right end should be marked Flyline end or End line.
We fold 5-7 cm of the cord twice, hold the loop with the left hand (thumb and forefinger). Pass with your right hand about 30 cm of the second cord (backing) into the loop, and hold it with your left index finger and thumb. Then we produce with our free hand the free end of the backing of 7-12 tight turns directed to the end of the loop from the fingers, capturing the loops of both cords.
We pass the end of the backing, which remains, into the loop back, adhering to the opposite direction to the one used at the beginning. As a result, both ends of the second cord should be on one side of the loop.
Now, gently pull with your left hand the two ends of the first cord, before that hold the knot with your right hand, and pull out the excess loop. Then we do the same, changing hands and tightening the second cord on the loop. It is necessary to follow the winding of the second cord (backing) so that it does not fly off the loop. Having done all the previous manipulations, we pinch the two ends of the first cord with the fingers of our left hand and strongly pull the second cord to tighten the previously wetted knot.
Surgical unit
For those who want to know how to tie the leash to the cord, we suggest that you familiarize yourself with the surgical unit, which is exactly for this purpose. This method can be called the simplest for linking two lines (cords) of the same and different in diameter, and even differing in the material of manufacture. As for the strength of this unit, with proper tying it is 100% of the strength of the materials that bind.
The main purpose of the surgical unit during fishing is to attach a leash to the fishing line (cord). Its disadvantage is that the length of the leash to be tied should be as short as possible. This is due to the fact that the attached end must be completely wrapped around the formed loop, and if it is too long, then there is a high probability that all the gear will be tangled.

So how to tie a leash to a cord? We take the free end of the main fishing line (cord) and the free end of the leash, put them together. We form a loop from the short end of the main cord and the attached leash, which must be wrapped several times together with the folded leash and the free end of the main cord. The friction force between the cords depends on the number of turns, that is, the more turns, the greater the strength of the assembly. In addition, with an increase in the number of turns, the dimensions of the assembly increase. This is visible primarily when tying two thick cords. Therefore, it is recommended to do no more than two to three full revolutions.
Knot for tying the cord to the spool
How to tie a cord to a spool? This must be done firmly and correctly, regardless of the cord used for winding. Therefore, we tie the necessary knot according to the following technique: we take the spool, wrap it with a cord or raise the logger on a reel; make a loop, wrapping the end of the working cord around the main one; we make three turns around the base, we wind the free end of the cord through the loop, placing it next to the base of the formed twist; tighten the knot, tighten the resulting loop. When tensioned, the cord is pulled around the spool. The remaining unnecessary end must be cut off.
Now you know how to tie the cord to the spool. After independently tying the cord to the spool, you will be convinced that this procedure is absolutely not complicated. It is much more difficult to calculate the amount of backing for winding that is necessary. But that's another story.
Nail Knot Node
How to tie the undergrowth to the cord? To tie a Nail Knot, you need to use a special tool or you can replace it with a small tube, for example, like a rod from a ballpoint pen.
So, we hold the cord located on the left, the tube, and also the end (thick) of the undergrowth, on the right, with the thumb and forefinger of the left hand, so that a 4-5-centimeter free end remains. Then we take the thick free end of the undergrowth with our right hand and wrap the cord, tube with undergrowth with the help of five neat turns that should fit snugly together. Now we wrap the coils with the index and thumb of the left hand so that they do not unwind when passing the thick end of the undergrowth, from right to left, into the tube. We carefully pull out the tube in the left-hand direction. We half-tighten the knot, carefully pull out the two ends of the undergrowth, and in no case pull the cord. We check that the coils fit tightly and evenly to each other. Next, we wet the knot, tighten it, for this by pulling at the two ends of the undergrowth. This knot should tightly compress the outer sheath of the cord, while crashing into it. To fix the assembly permanently, pull the cord and undergrowth in different directions. Cut off the excess ends of the undergrowth and cord.
Knot Arbor
How to tie a cord to a reel? The most basic and common way to attach the cord to the reel is the Arbor Knot assembly. The technique of its execution is as follows. We tie a regular knot at the very end of the cord, then tighten it tightly. Next, we pull the cord through the coil so that its end with the bundle is lower from the spool, we tie the cord with the same end. Everything is done using a regular node. After all this, tightly tighten the second node, after which we tighten the loop located on the spool, pulling the cord by the free end.
Node Trailin
You can learn how to tie a cord to a swivel by examining the technique for tying the Trailin knot. This method also refers to one of the most durable and reliable for attaching the cord to swivels, hooks, artificial baits. Trailin's peculiarity is that he does not slip.
To tie such a knot, you must double-pass the end of the cord through the eye of the hook. Then wrap the end of the rope five to six times around the root end. Next, we pass through the initially formed double loop, which is located near the hook, the remaining end. Wet the knot with water, tighten it, cut the end not very short. For insurance, the end length must be at least 3-4 mm.
Double grinner knot
How to tie a cord to a fishing line? This type of knot is used to bind two lines of the same diameter or slightly different diameter of the lines, as well as to bind a cord and fishing line.
The technique of the assembly is as follows. We put the fishing line and cord together so that their ends are located towards each other. Now we take the end of the fishing line, from it we form a loop. Wrap them with a cord and a formed loop. We make about 5-6 revolutions, from the loop we end the line. Wet the knot and tighten it well. We carry out the same manipulations with the end of the cord. The result is two nodes that need to be pulled towards each other. We cut off the excesses of each end, leaving somewhere 1-2 cm.
Node "Palomar"
How to tie a hook to the cord? "Palomar" is a knot with which a hook is attached to the fishing line (cord), the front sight to the leader (leash). This is one of the nodes in the group of proven, reliable and durable fishing units. He is tied so. We bend the end of the cord in half so that the loop is flat and open. Pass the bent end through the hook, or rather through its eye. We take the same bent end and form a simple knot on the cord. We pass the bend of the cord over the hook, then over and into the girth of the nodule. Wet the knot with water, tighten the ends to fix it. Shorten the ends if necessary.
When the loop is already passed through the eye, you need to tie a simple knot with this loop. In this case, the loop will pass through the hook and be tightened under the eye around the loop. The result is a free, for rotation in the node, position.
Hanging loop
How to tie a carabiner to a cord? Such a node forms a loop located at an angle of 90 degrees to the middle of the cord. The hanging loop is convenient for tying carabiners, swivels, hooks and other fishing equipment to the main fishing line, cord, conical undergrowth (leader) to provide backup fastening to the additional fly.
The described node is tied like this. We form a large loop in the middle of the cord. Hold the center with your finger and wrap the loop around this intersection point about six times. We make a hole in the center through which we pass the loop. Holding the loop with our teeth, grease the knot with water and tighten it.
Wetting with water and tightening the knot, we change its structure. By pulling on each rope, the revolutions that were twisted, you can rearrange the twist so that the inner thread will act as an external thread.