The interior of the kitchen is largely dependent on the ceiling. After all, its design can negate the beauty of the room. And it can add elegance and add practicality. False ceiling in the kitchen - a great option for this room. This design is time-tested. In addition, it is not difficult to install it yourself.
Design Features
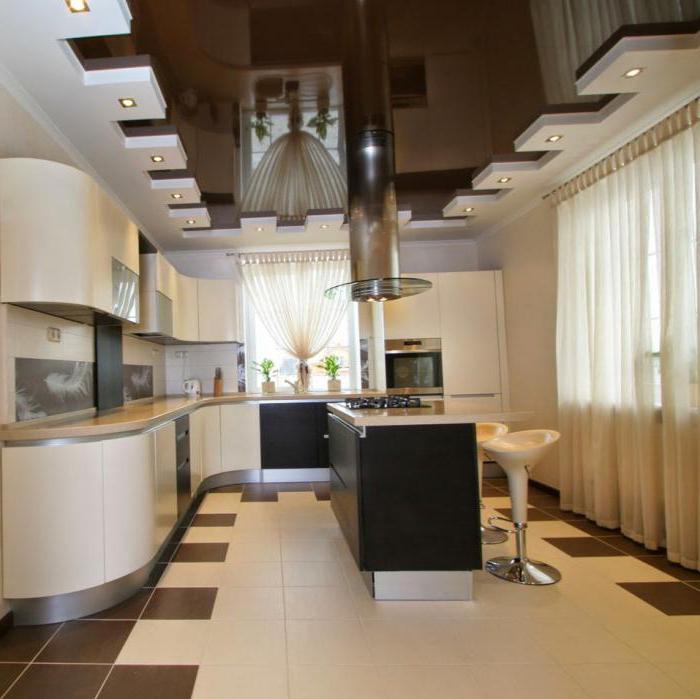
The suspended ceiling in the kitchen (the photo in the article allows you to get acquainted with excellent interior designs) consists of two elements:
- The frame is made of metal, which is fixed on the floors.
- Modular parts. Of these, in fact, is the ceiling surface.
Various communications and lighting fixtures can easily fit between the main surface and the new ceiling base. It is very convenient and practical. Because of this, the suspended ceiling is called a fake structure.
Modular parts come in many forms: plates, cassettes, slats, panels. And they are made:
- from glass and mineral fiber;
- steel and aluminum;
- reinforced gypsum and drywall;
- a tree;
- plastic;
- Fibreboard, MDF, TsSP;
- laminate flooring.
The main advantages
False ceiling in the kitchen has many advantages:
- It perfectly masks the old coating and bumps.
- Wiring and other utilities are securely hidden. However, they are easily accessible. Therefore, if necessary, they can be changed without problems.
- The ceiling is quickly mounted.
- Materials are available and relatively inexpensive.
- The design makes the room brighter by improving the diffusion of light from electrical appliances. And if the surface of the ceiling is glossy, then it also reflects daylight.
Varieties of designs
The following types of suspended ceilings of the kitchen are distinguished:
- panel;
- cellular;
- cassette
- trellised;
- rack and pinion;
- tiled.
False ceiling in the kitchen from the panels is very popular. Tiled surface is also in great demand. This is a simple design. First, a frame is prepared, on which panels painted in white are worn. Then, if desired, they can be repainted in any shade.
Of course, it is not necessary to adhere to classical designs. You might want to make photo printing on glass. Such options look pretty interesting.
Benefits of Plasterboard Kitchen Ceilings
Designers are very fond of drywall because of its pliability. Inside, you can easily insert the backlight, make bulges and hollows of different shapes and sizes. Finishing options are many. The suspended ceiling in the kitchen from gypsum board can be pasted over, lined or painted.
Today it is the most demanded material for room decoration. You can create such a design quickly. And even a novice master will cope with the work.
There are three options for the complexity of the ceilings that are made from drywall:
- smooth;
- vaulted bending;
- curly.
Tools and materials
If you are planning to create a false ceiling in the kitchen with your own hands, then initially prepare everything you need for work.
From the tools:
- level - simple and water;
- roulette wheel;
- mounting knife;
- drill or screwdriver;
- spatulas of different sizes;
- peeling and edging planer;
- sandpaper of different grain size;
- grinding machine;
- set of crowns.
From materials:
- waterproof drywall sheets;
- CD and UD guide profiles;
- connector crabs;
- direct suspensions;
- self-tapping bugs;
- a set of dowels "quick installation" and a drill of the same diameter.
Single-level kitchen ceilings
A fairly simple option. If you conceived a suspended ceiling of a small kitchen, then it is best to choose a single-level one. Such surfaces are most often used to cover rough surface flaws. They will be a great solution if there is a desire to change something in the interior.
Making a multi-level ceiling
But the ceiling with several levels is already a more complicated matter. Especially if you have conceived roundness. In the kitchen, the humidity level is always elevated. Therefore, take drywall drywall. Indeed, in the interval between the levels will be wiring, exhaust hood, ventilation.
Preparation and fixing of guides
First you should choose the design of suspended ceilings in the kitchen.
To do this, do:
- A drawing that determines how much and what materials are required.
- Marking, plan, marking the box on the surface. We assume that the installation will be done on concrete.
- Draw the points through which the lines for the installation of profiles are drawn.
- A simple level to check for distortions. Draw lines on the dots.
- Drill holes in the right places and attach the UD profile.
It is important to check several times that the hole marks are correctly set. If you get a skewed ceiling, it will be difficult to fix it.
Suspension Mount
We continue to create a suspended ceiling in the kitchen:
- Fastenings are made along the entire length of the profile, every 0.5 meters.
- Each row of suspensions is mounted at a distance of 0.5 m from each other by "quick installation".
- The ends of the profile must be inserted along the guides. Then the profile is attached to the suspensions.
- Stiffeners run perpendicular to the profile and are made at a distance of 0.5 m from the wall.
- Stiffness profiles and ribs are “stuck together” by crabs. For this, self-tapping bugs of the smallest size are used. As a result, a grid of profiles with dimensions of 0.5 * 0.5 m should be formed.
Important to remember:
- The lattice must be done. Otherwise, the drywall will sag, and all work will be spoiled. It is necessary to calculate so that the sheets are well connected along the edges and profiles.
- You can check the profile sag either by level or by a tightened thread.
- For cutting use scissors for metal. From the grinder, the ends can oxidize and rust.
- Self-tapping screws must be taken stainless. Blacks can destroy stainless steel.
Fixing GKL (drywall sheets) to the frame
It is important to correctly position the GCR. They are attached from the joints to the edges of the sheets. Otherwise, there may be a problem with further docking. It is better to use a screwdriver. If you choose a drill for this work, then only with an adjustable speed.
It’s hard for one to handle, it’s better to do with someone who can support the sheets. If you do it alone, then you need to build something like scaffolding, like at a construction site - goats and a mop. On the goats, place one end of the sheet. A mop will support the middle. This is not very convenient, so you need to work quickly.
Pay attention to the following points:
- GKL should be taken ceiling - they are thin and light.
- After installing the sheet, draw lines with a pen in the places where the profile passes. Otherwise, attaching another sheet, you will not see where you need to twist.
- Self-tapping screws are used only stainless so that there are no spots of rust.
GKL processing and plastering
Final work on the creation of the first level:
- All joints are glued with a serpentine tape - interwoven fiberglass impregnated with glue.
- You can take any primer. Apply it with a brush, like paint.
- Then turn putty. It is applied with a spatula and smoothed. Pay particular attention to screw caps and joints. Wait for it to dry completely. If you plan to spot lights (spots), do not forget to make holes for them with the appropriate crown.
Second level
Multilevel ceilings are often made to highlight design elements (separation of the working area and the food intake area) or for greater beauty and showiness.
How to do the first level, you already know. And then comes the assembly of additional boxes. There are many options:
- You can make a hem around the perimeter of the main box.
- On the contrary, focus on the center.
- If you want beauty and complexity, make steps that go into wall shelves, in several levels.
Consider how the suspended ceiling is mounted in the kitchen, providing for the second level. We will analyze a simple option. In it, the second level will be located above two zones - the working and over the area for eating.
It will look like two semicircles located at different ends of the kitchen, which are separated by an oval.
So, the first level is ready, proceed to the second:
- The UD profile is mounted at a distance that you choose yourself from level No. 1.
- In the center of the kitchen, a self-tapping screw is fixed. The radius of the semicircles is calculated, a lace of the same length is measured out and attached to the self-tapping screw.
- A pencil is tied to the other end of the lace. The lace is pulled and a circle is drawn with a pencil (compass principle). These will be two semicircles. This method preserves the proportions of the ceiling.
- Profile ribs are cut with scissors. They bend along the contour of the first semicircle on the ceiling. Then they are screwed to the ribs of level No. 1.
- The length of the edges for the second semicircle depends on its bends. At this stage, you must not forget to hold the wires for the spots.
- The box is sewn up with GKL sheets.
- Through the holes made by the crown, wires for spots are passed. Sheets are cut with a hacksaw for cutting gypsum plaster or a jigsaw (but it needs a special nail file).
A piece of sheet bends quite easily. A special bobbin with sharp tubes that leave holes is rolled along the sheet. Then a section of the sheet is wetted with water and screwed to the profile. It will bend and repeat the shape of the bends. Further, as in the first level, there is puttying, sanding and painting. Now, if you are asked how to make a suspended ceiling in the kitchen (and not only), you can easily answer.
What shape the ceiling will have depends on your imagination. You can draw different sketches. But what is absolutely certain, with such a ceiling, any room will change dramatically.