Linux is mainly used on servers. About 90% of the Internet runs on such servers, using, for server, Ubuntu commands. This is because this OS is fast, safe and free. The main problem with using Windows servers is their cost, so users all over the world have chosen Linux as their servers. In addition, approximately 80% of the world's smartphones work on Android, which is also made from the Linux kernel. This, among other things, is also safe, since most viruses in the world attack Windows, which cannot be said about Linux. Therefore, knowledge of the basic Ubuntu commands is a recognized need for any programmer.
Command line terminal
Linux is a program that receives commands from the user and passes them to the OS for processing. The Ubuntu shell is its main part. And distributions come in a graphical user interface (GUI) and command line interface (CLI). To open the Ubuntu command terminal, press Ctrl + Alt + T or Alt + F2, type gnome-terminal and press enter.
The root is the base of the Linux file system. It is indicated by a forward slash (/). The user directory is usually set to / home / username. When the user is in the home folder and he needs to go to the "Downloads" folder, the following is written in the command line: cd Downloads. One must be careful when writing this line.
For example, a user has a folder called One Pi. In this case, when you enter: cd One Pi, the shell will accept the second argument to the Ubuntu command, so the user will receive an error message indicating that the directory does not exist. Here you can use the backslash, that is, you can use: cd One \ Pi.
Spaces work as follows:
- If you simply type cd and press Enter, it will take the user to the home directory.
- To return, you can enter "cd ..". Two points perform the opposite effect.
- When you need to create a folder, use the Ubuntu mkdir command, for example, if you need to create a directory called DIY, enter mkdir DIY.
- If you want to create a directory called DIY Hacking, you can enter mkdir DIY \ Hacking.
- To remove an empty directory, use "rmdir", to delete a directory containing files, register "rm". But “rm” cannot just delete the directory, for this they use “rm -r”, after which it deletes both the folder and the files contained in it.
- The mv command is used to move files through the command line or to rename a file. For example, if you want to rename the text file to new, write: mv text new. The OS takes two arguments, like the cp command.
- The locate command is written if you need to find the file in the system.
- Using the “-i” argument with a command allows you to ignore the case, no matter if it is uppercase or lowercase. For example, to find the hello file, enter locate -i hello.
- If the name consists of several words, of which the user remembers two, they can be separated using an asterisk (*). For example, to find a file containing the words hello and this, write: locate -i * hello * this.
Ubuntu Basic Commands
Ubuntu is one of the most customizable operating systems. To begin to understand the various complexities of the system, you need to familiarize yourself with the most everyday commands used in the operating system.
Ubuntu development benefits:
- The fastest route from development to deployment on desktop, mobile, server or cloud devices.
- Desktop for developers at some of the world's leading technology companies.
- The widest and best tools and libraries for users.
- Easy to either run natively, or in a virtual machine, on a PC or Mac.
- Ideal for any demanding environment, from data mining to large-scale financial modeling.
List for beginner programmers:
- mv - moves files between folders.
- rm is the Ubuntu uninstall command.
- cp - copies documents for transfer to the directory.
- chown - change the ownership of the file.
- chmod - change access rights to the document.
- ls - Browse files in a directory.
- pwd is a demonstration of the working directory.
- sudo - allows you to run Ubuntu startup commands with administrator privileges. It is especially useful for modifying files.
- cd - changes the working directory, used to go to specific files.
Thus, the main commands of Ubuntu serve for the integrated use by the user of the computer operating system.
Access to sudo root
Literally, this means Super User DO and is a command that allows you to have access to the root superuser without registration. It is usually used in conjunction with the Apt-get utility. This is another very powerful tool used to update source codes (repositories) of software, to update existing programs. This is the command to install Ubuntu. The sudo apt-get command downloads updates and installs new versions of installed software.
First you need to make sure that the source files are updated first, and the user receives the latest option. This command first downloads and then installs new software. For example, if you install software called onebox, write: sudo apt-get install onebox.
Now, to remove existing software: sudo apt-get remove onebox.
Retrieving a list of dirctories files
The Ubuntu ls console command installs all the files; if the user wants to see the complete list, he additionally uses the letter l: ls –l. The “-a” parameter will help to display all files, including hidden ones: ls –a.
The touch command uses to create a file. It can be anything: from an empty txt file to an empty zip file. For example, touch new.txt. To learn more about the command and how to apply it, use man, which displays the manual pages for this function. For example, man cd shows the manual pages for cd.
Entering a command name and an argument helps show how to use it, for example, cd –help.
Example Linux Ubuntu touch command to create an empty new file: touch newfile.
The mkdir command creates a new empty directory, prescribe: mkdir newfolder.
To add content to a file using the cat command with the redirect ">", press Ctrl + D and add the text: cat> myfile. View the contents of the file using the cat command, writing: cat myfile.
You can change the directory using the cd command, by default the user is in the home directory. For example, to move this directory to the desktop, write: cd Desktop.
Linux Ubuntu commands are case sensitive, so you cannot type deskop, namely Desktop. To return to the previous directory, the home directory says: "CD ..", a double dot means the parent directory. Only the “cd” command will bring the user to the home directory, wherever he is.
Working Directory Demo
The Ubuntu pwd console command shows the current directory with the full path name, and rm means “delete”, and this will delete the myfile file, without the right to restore it from the trash: rm myfile.
To copy files, use the cp command, which will copy the file from the home folder and paste it onto the desktop. By default, the user is on the desktop, so he does not need to change the directory: sudo cp abc Desktop.
The Ubuntu mv terminal command is used to move the file to another location. The following command cuts the file from the Home folder and pastes it onto the desktop: sudo mv abc Desktop.
Utility Utilities
The nano, vi, jed-nano, and vi utilities are already installed as text editors on the command line. Nano is a good text editor that highlights keywords with color and can recognize most languages. The vi editor is simpler than nano. You can create a new file or modify an existing one with these utilities. For example, if you want to create a file called check.txt, write the Ubuntu nano check.txt terminal command. Then they save the files after editing, using the sequence Ctrl + X, and then Y if “yes” or N for “no”.
The df command is used to view free disk space in each of the system partitions. You can simply enter df into the terminal, and each mounted partition will be displayed on the screen, used and available space in%. If you want it to appear in megabytes, the df -m command is written. If you need disk usage information for a specific folder, enter the df command and the folder name. For example, if you need to know the disk space of a document folder, write du Documents or ls -lah to see the file sizes in the folder.
The tar archive command has a long list of uses. They can be used to compress and decompress various types of tar archives, for example, tar -cvf to create a .tar archive, tar - xvf to decompress a tar archive, tar - tvf to display archive contents.
The zip, unzip commands are used to compress, unzip and extract files from a zip archive. To display information about the system on which the distribution is running, use uname. When using the uname -a command, most of the information about the system is printed: release date, version, processor type, etc.
To check the connection to the server, use the ping command. This is a software utility for administering a computer network, used to check the availability of a host on an Internet IP protocol network. When you enter an Ubuntu command expression for a server, for example, ping google.com, it checks to see if it can connect to the server, measures the round-trip time and gives detailed information about the process.
Software package installation
There are several ways to get software packages or applications to install on Ubuntu. The common path is through its software center. This process is the easiest, mainly using the point-and-click style. But some software applications cannot be found and installed in the official program repository. Very often, distributors of applications for the Ubuntu platform prefer to distribute them by providing a downloadable Debian package (.deb) from their websites. The deb package contains all the features for an application that successfully installs it through the terminal using the following steps:
- Open a terminal by pressing Ctrl + Alt + T.
- Enter the command: sudo dpkg –i_ / path / to / deb / file. The dpkg utility is a low-level package tool used to directly install software packages.
- Enter: sudo apt-get install –f.
Updating Ubuntu is a very simple process. Even a novice user can easily upgrade it from one version to another on the first try. The developer has made the upgrade process much easier with zzupdate, a simple command-line utility to completely upgrade a PC or server mainly in hands-off mode.
The official and recommended way to upgrade any version of Ubuntu to the next available version is to run the following commands, one after the other, followed by the instructions on the screen.
The user needs to run all these commands to update Ubuntu. Below in the photo you can see detailed information.
Zzupdate is a team for updating Ubuntu.
Introduction to BASH Command Line History
BASH (Bourne Again SHell) is the default command line shell used by Ubuntu and most other distributions. Users do not modify the shell they access through the terminal. When a terminal session is closed, BASH writes all its commands to the bash_history file. A new session of commands that are executed for the workflow becomes a new history of commands. It is important to remember that commands executed for a session are recorded only on exit. If two sessions work simultaneously, they cannot cross-reference the newly executed commands in another session. In addition, if a terminal session is forcibly terminated, the command history will not be updated, and the Ubuntu command cannot be found.
An easy way to get started with the command history is to simply navigate with the up and down arrow keys. Using them, you can scroll through previous commands one at a time. Once the right one is found, you can consider it as if it was typed on the command line. Press Enter to execute the command again or change it, as necessary, before execution. This method is very good for quickly restarting commands.
Search and run previous commands
BASH provides a history command with a number. The user can force the history command to produce only the last quantity by specifying a number. For example, if you want to see the previous ten commands, you can write:
It should be noted that the last command is the same as the one that was run to create it. The functionality of the BASH Ubuntu team also allows you to search your history and complete your first session. The main form of this process is looking for matches at the beginning of the! Find command. Ubuntu runs the most recent command, starting with find. You can also search for all the commands to match “!? Link?”. It runs the latest containing link. As with many Linux tools, you can achieve great power by combining the tool with regular expressions. History in BASH allows you to run previous commands by searching and replacing in Regex mode.
Computer restart and shutdown
Since the creation of Linux, it has been a command in the terminal, and this has been the main means of communicating with the OS. Later, a GUI appeared, and now the main focus of publishers is the development of a convenient desktop.
Basic tasks, such as logging off, shutting down and restarting the computer from the terminal, are simple using the command line.
Sign Out:
- Launch Terminal and enter the following command: gnome-session-quit. This command will display a warning if there are unsaved documents in the session, and will make it possible to save them.
- As an alternative, you can use the “log off” option, which will stop all running programs and even unsaved documents without warning: gnome-session-save -force-logout.
- The logout command is not direct, so it’s very difficult for beginners to remember it, especially if they have never heard of the GNOME environment.
- You can add a custom alias using the gedit command: gedit ~ /.bash_aliasesalias logout = "gnome-session-quit".
- Then a new exit is assigned with an alias that Ubuntu reads as gnome-session-quit and initiates a logout command.
- Now you just need to enter the logout command: Logout.
- Ubuntu shutdown command: shutdown. However, the command does not turn off the PC immediately. Instead, the timer starts and gives a minute time to save all programs.
- If immediate shutdown is required, use a different command, and before executing this command all documents must be saved: sudo shutdown -P now.
Some Shutdown options: shutdown + t "your message".
This command line turns off the PC after the specified time t in minutes and displays the message in quotation marks along with the standard completion dialog box.
Here is an example command: shutdown +30 "Leave to pickup friend!".
In addition, there are two Ubuntu reboot commands on the computer:
Sleep: sudo pm-hibernate.
Suspension and sleep: sudo pm-suspend.
OS recovery after crash
If a mysterious error message appears on the screen at the time of launch, or, even worse, a blank screen, it means that the user has problems with starting. No matter how many times a reset or restart is pressed, he sees that the same impermeable barrier blocks the start. Before you find a remedy for starting failures, you need to understand the principle of the boot process.
It can be divided into three broad platforms centered around the Grub 2 bootloader: pre-Grub, Grub, and post-Grub. Knowing this allows you to focus on troubleshooting based on the process in which the error or braking occurs. If a user tries to start a bootable boot-repair disk, it is recommended that you experiment with different boot options and fault tolerance.
Start from the very beginning:
- Turn on the computer. If power is supplied, but nothing happens to the PC anymore, there is most likely a hardware problem. To eliminate the malfunction, it is necessary to check the correct connection of the last connected device.
- If there is no result, disconnect all external devices except the keyboard and try again.
- If this does not work, open the case and disconnect the internal drives.
- If the computer now boots onto the splash screen, you can try to reconnect the internal drives and try again.
- If the login screen now loads, turn off the computer and begin reconnecting external peripherals to make sure that the problem clears itself.
- , , - MBR Grub.
- If Grub is not installed automatically when the computer starts, you need to try restarting the PC by holding the Shift key or pressing Esc to open the Grub boot menu and make sure that it cannot boot.
- Go to the "Restore Download" section. If Grub is already loading, but cannot find any bootable OS, the user will be offered several scenarios: a basic command prompt, such as grub> or grub rescue>.
- They indicate that one or more of the files required by Grub are missing or corrupt.
- After pressing C, the user will be able to enter the Grub Terminal mode to perform basic checks and repairs and try to manually initiate the download by pressing Ctrl + X or F10. Using the set command to view the current settings and change such as, for example, graphic mode.
- If the Grub menu appears, the problem may be related to its configuration file.
- If, after selecting an option, the menu immediately stops, but the OS starts loading before stopping, then the problem is with the operating system, in this case, you need to go to the post-grub troubleshooting section.
- If a user tries to fix Grub problems manually or does not see Grub on the system at all, portable media with recovery systems and Boot-Repair should be used.
- Boot-Repair itself will start automatically when booting from a software disc. The Boot-Repair tool is focused on those early problems with loading MBR and Grub. It basically provides the user-friendly interface needed to solve many problems. The tool offers the Recommended Repair option, which promises to fix the most frequently occurring problems, or the Advanced Options option, to manually select specific fixes. The tool automatically generates a system log and tries to execute it.
Unix command line tricks
Throughout the entire period of using this OS, advanced users collect various “advanced things” and share them with pleasure in reviews:
- Compress, split and encrypt files. Trying to transfer large files to computers is a tedious task. You can easily do this by compressing files and creating a multi-volume archive if they are extremely large.
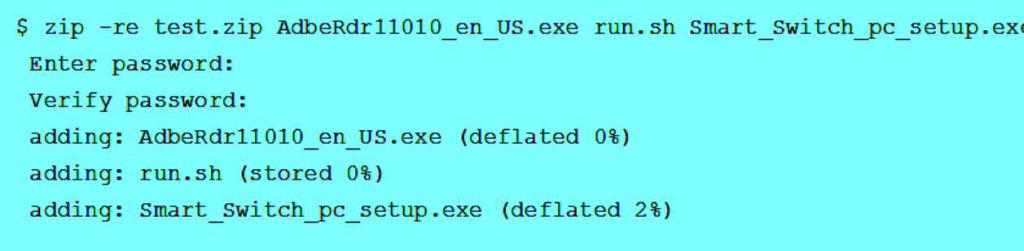
- Copy and paste multiple lines of IDL code. The user can paste several lines of text from the clipboard into the command line. To do this, put some text on the clipboard and paste it into the command line. Any source of text is valid with emphasis on the requirement to convert text to ASCII.
- When a command line version of IDL is used on tty and multiple lines are inserted, make sure that they contain only one IDL command or are statements containing line continuation characters ($). Multiline statements will create unintended IDL interpreter behavior or errors. Lines are passed to the command line as is. White space is not removed, and comment lines are sent to the IDL interpreter.
- If you are using the IDL Workbench, you can insert several statements directly into the command line. And you can also drag one or more lines from the Command History window to the command line.
- Calling up teams. By default, the IDL saves the last 500 commands entered in the revocation buffer. These commands can be viewed, edited, and re-entered. The “Command History” window to the right of the console displays the command history for the day. You can reuse and edit commands by clicking them on the command line. The up arrow key on the keyboard resembles the previous command entered in the IDL. Pressing it again brings up the previous line, moving backward through the list of Ubuntu command history. The down arrow key on the keyboard moves forward through the command history.
Using the HELP procedure with the keyword RECALL_COMMANDS displays the entire contents of the revocation buffer in the IDL console. A team call is always available in the IDL Workbench. Command recall is enabled for the tty command-line version of the IDL, setting the IDL_EDIT_INPUT parameter to true, which sets the EDIT_INPUT system variable to a non-zero value (default is 1).
Easy ways to fix or undo text in a terminal:
- Go left one word: ESC + B.
- Go right one word: ESC + F.
- Go to the top of the line: CTRL + A.
- Go to end of line: CTRL + E.
- Delete previous word: CTRL + W.
- Clear entire line: CTRL + U.
The output of commands such as l, df, du, in user-friendly formats, is presented below.
Quickly find the differences between the two directories. The diff command compares files line by line. The team can also compare two directories.
All recommendations in this article are standard features and should work on Ubuntu or similar systems. This minimum set of functions in each area fully ensures the work of a novice user. As soon as he gets used to their application, these little tricks will make him a real pro in this shell, who will perform any task with minimal typing with lightning speed.