In the program Adobe Photoshop not only retouch portraits - it is often used to create illustrations. You can turn any picture into an unusual picture by following a few simple steps. The peculiarity of the program is that to work in it it is not necessary to have artistic talent and the ability to draw. Without even having special knowledge, you can create a beautiful postcard, and after a little training and mastering the functionality of the program - a stylized portrait or landscape. For a newcomer who is just getting to know Adobe Photoshop, it's best to start with a postcard. Its creation consists of 3 stages: stroke outline, color casting, applying chiaroscuro.
How to choose a photo to create an illustration?
Before you learn how to make a picture from a photo in Photoshop, you need to install it by downloading it from the official site. The manufacturer allows you to use the program for free for two weeks - this time will be enough to get acquainted with the interface and learn how to draw simple illustrations. In order to make a picture of a photo, Adobe Photoshop is best suited. It is most convenient to use a photo in the Flatlay style as the basis for creating a postcard - objects in such a picture are located on a flat surface and are photographed from above, at an angle of 90 degrees. It is advisable to take a photo on your own so as not to infringe anyone's copyright.
Program settings for creating contour illustrations
There is a way to make an outline drawing from a photo quickly and effortlessly. To do this, you need to get acquainted with such a tool as the Pen. But first you need to configure Adobe Photoshop in a special way. In the first step, create a new document. To do this, on the toolbar, click "File", then "Create" and in the window that appears, enter the following parameters: resolution 300 pixels per inch, white background, RGB color mode - and click the "Create" button. Choose the size of the document yourself, it should be in centimeters. Then you need to set up the Brush tool in a special way. Please note that you will draw the contour with the Pen, but you need to configure the Brush. After choosing a tool, activate it and go to the settings: the size will change, but first you can choose about 15 pixels. The appearance of the brush is solid, with clear edges. Transparency and pressure should be equal to 100%, select “Normal” mode. Then, on the right toolbar, go to settings and check the box “Shape Dynamics” and “Smoothing”.
Learning to work with the Pen tool
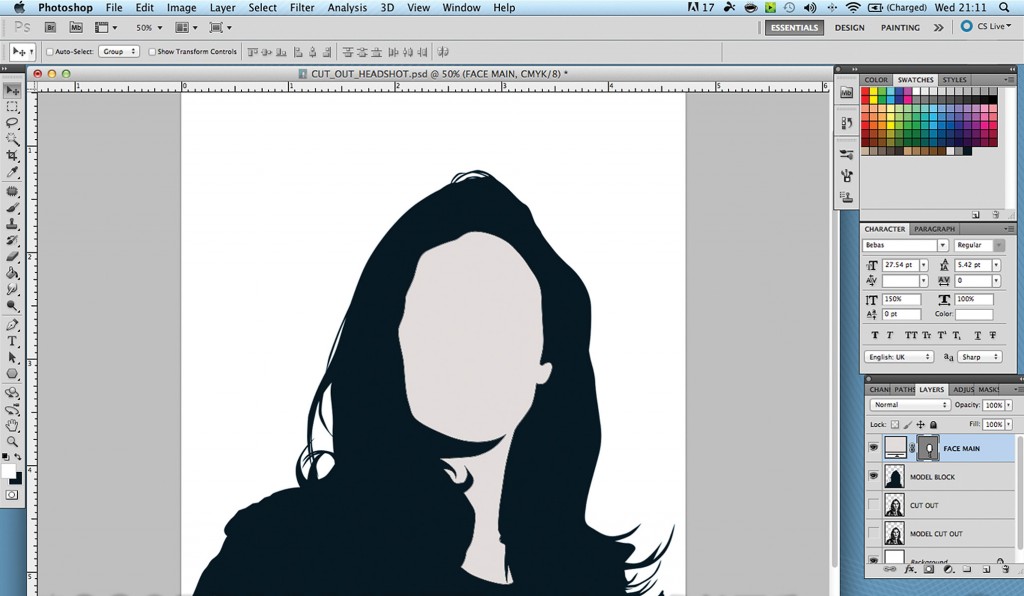
First of all, create a new layer by clicking on the “envelope” in the window with layers. Name it Contour. Further, all actions to create a path will be performed on this layer. Now you need to practice a bit to understand how to use the Pen tool. Select it on the panel and, left-clicking on the canvas, put the first anchor point anywhere. Then move the mouse and put another point - you get a line. It can be bent in different directions - to do this, put another point in any part of the line, hold down the Ctrl key on the keyboard and “drag” it with the mouse while holding the left button. A “antennae” will appear next to the point - it also allows you to change the curvature of the line. Having created a bend, release the Ctrl key - the line will be fixed.
How to create a smooth line with Pen?
Add another anchor point and experiment with the line, bending it in different directions. Now we proceed directly to creating the path: right-click on the canvas to call up the submenu, select the option “Outline the path” in it. A dialog box will appear in which you need to select the Brush tool and select the option "Simulate pressing". You will get a smooth, sharp line with sharp edges. Right-click on the canvas again and select the "Delete contour" item. Try creating a smooth line without checking the “Simulate pressure” option, and compare the results. You have taken the first step to understanding how to make a picture from a photo.
The first step to creating an illustration: outline image
Drag the photo you’d like to make an illustration into Adobe Photoshop. Hold the Shift button on the keyboard, drag to the edge of the photo with the mouse to resize it without distortion. Canvas sizes and images must match. Place the photo layer between the background and the layer where the outline will be located. If the image is not dragged into the program, right-click on it and select “Open in the program”, and then drag it into the working document using the “Move” tool. Before you make a drawing from a photo, practice creating an outline in some illustration with clear lines, and then proceed to outline the outline in the selected photo. First, put two anchor points, then another one in the middle of the resulting line, hold down Ctrl and drag the line, giving it the desired bend. Change the thickness of the brush to make the line thinner or thicker. Start outlining the main contours of objects. For convenience, the opacity of the photo layer can be reduced to better see the resulting lines. Surplus and incorrectly drawn outline can be removed using the Eraser tool. Save the picture in PSD format.
How to choose a color scheme for a card?
To fill with color, create a new layer and name it “Fill”. Place the layer under the “Contour” layer - this is very important, otherwise you will begin to color the drawing on top of the contour, overlapping it. Before you make a drawing from a photo, you will have to understand a little about the art of coloristics. To make the picture look more harmonious, try to limit the number of colors used. It is advisable that some items be painted the same. A pile of different shades will make your illustration tasteless. Choose 4-5 basic colors and change their tone to a lighter. The color can be taken using the Eyedropper tool from the photo itself or selected from the Samples panel. Try to take not too dark shades - they will still be needed to create shadows.
Second Step to Creating an Illustration: Color Fill
To fill an object with color, go to the filled layer and begin to draw a pen around its outline, which you drew in the previous step. Then right-click and select the option “Fill the contour”. The object is filled with the selected color. If this does not happen, check the settings on the top panel. In the submenu, select the icon in the form of two intersecting squares and make sure that the checkbox for the option “Exclude overlapping shapes” is checked. Continue to outline the shapes and fill them with color until you have completely painted the illustration. At this stage, you do not need to touch the background - you can change its color at the final stage of work. Using "Pen" is an option for making a "cartoon" picture out of a photo. If we stop at this step, we get a flat image without shadows and penumbra, reminiscent of how cartoon characters are drawn.
The Third Step to Creating Illustration: Shadows and Lights
Make the picture more like a photograph, and the objects on it - voluminous and bright will help the arrangement of light and shadow. Objects that fall into the field of human perception always have lighter and darker parts. How to make a picture out of a photo with elements that the human eye will perceive in volume? To do this, you need to understand how in reality light is distributed on the surface of objects. Light falling on an object creates a glare - this is the lightest part of the surface. Next is the penumbra - it is darker than the glare, but lighter than the shadow. A shadow is the darkest part of the surface of an object. But there is still its own shadow - the object casts it onto the plane on which it is located. This space is the darkest. To make a photo a color picture, conveying gradations of light and shadow on the surface of objects, you need to take darker and lighter shades of the main color, so when filling it is not worth choosing too dark tones, otherwise it will not work to draw a shadow.
How to determine the location of glare, partial shade and shadow?
Before starting work on a photograph, determine the light source and its direction. Then create a new layer and name it “Chiaroscuro”. Using the pen, draw the contours first for partial shade, then for shadow, and then for highlight. Fill them with the same method as in the previous step - using the command “Fill the contour”. When finished, create your own item shadows.
A little tip in the direction of the light:
- if the source is on the left, then on the right there will be a shadow, partial shade, and on the left - a glare;
- if the source is on the right, then there will be a shadow, partial shade on the left, and a glare on the right;
- if the source is on top, then the shadow, penumbra and highlight are in the center.
Now it remains only to make a background. To do this, go to the very first layer and fill it with the desired color or gradient. You can add any text by choosing a beautiful font and using the appropriate tool. Save the resulting illustration in JPEG format, print it on a color printer - and the card is ready.
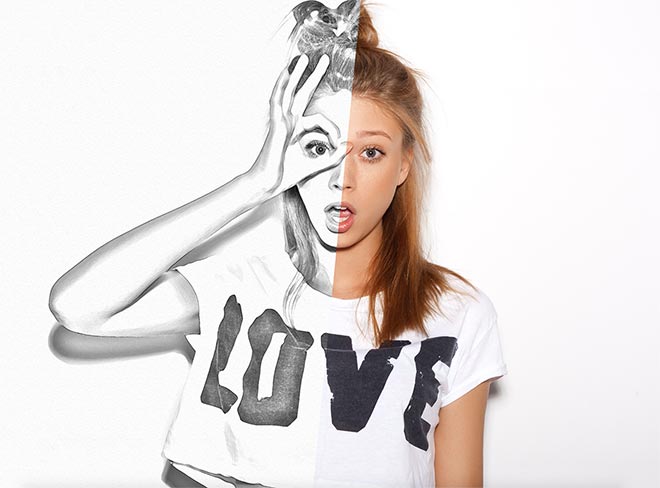
Pencil drawing in Photoshop
Also try to draw a photo from a photo with a pencil in Photoshop. This is much simpler and faster than creating a color illustration, but the result will surprise you. To begin, open the selected image in the program and create a duplicate layer by pressing the key combination Ctrl + J. Click on the round icon at the bottom of the layer window and select the “Color Tone / Saturation” option. Change the Saturation value by dragging the slider to -100. Click on “Layer 1”, making it active, and in the drop-down menu select the overlay type “Lighten the base”. Press Ctrl + I to invert the layer. Go to the "Filter" menu on the top panel, select "Blur" and then "Gaussian Blur". Move the slider to achieve the desired effect.
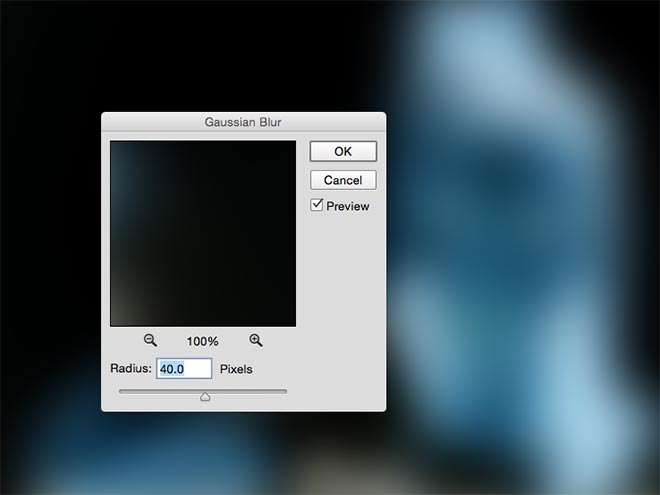
Go back to the window with layers and click on the round icon to bring up the “Levels” submenu. Move the leftmost slider, trying to make the image as close as possible to the picture. If some of its parts seem too dark for you, select the Brush tool and, having made the brush color black and set the opacity to 40%, go through them to the desired areas, highlighting them. To “clean” the background from gray spots, set the brush color to white, the background to black and change the opacity to 100%. Save the image in the desired format. Now you know how to make a pencil drawing from a photo. Use new knowledge and create your little masterpieces.